Campaigns
Campaigns are used to publish created offers, thereby making them available for customer redemptions. When creating the offer, the marketer lays out the core information (specifics, products, T&C etc.) and in the campaign adds the necessary details for redemption (such as type, schedule, location etc.).
For more information on Offers, please click here.
Campaign Creation
Navigate to the campaigns tab and notice the four submenus displayed.
Let's begin with guiding you as a marketer with the "How To" of creating a new campaign (or click here to go directly to learn about Managing your campaigns).
- Click on the Campaign Management submenu.
-
Then click the
See the sample below and familiarize yourself with the details. Review the fields and then follow up with the comprehensive description that guides you through creating your new campaign. icon to display your Add Campaign details window.
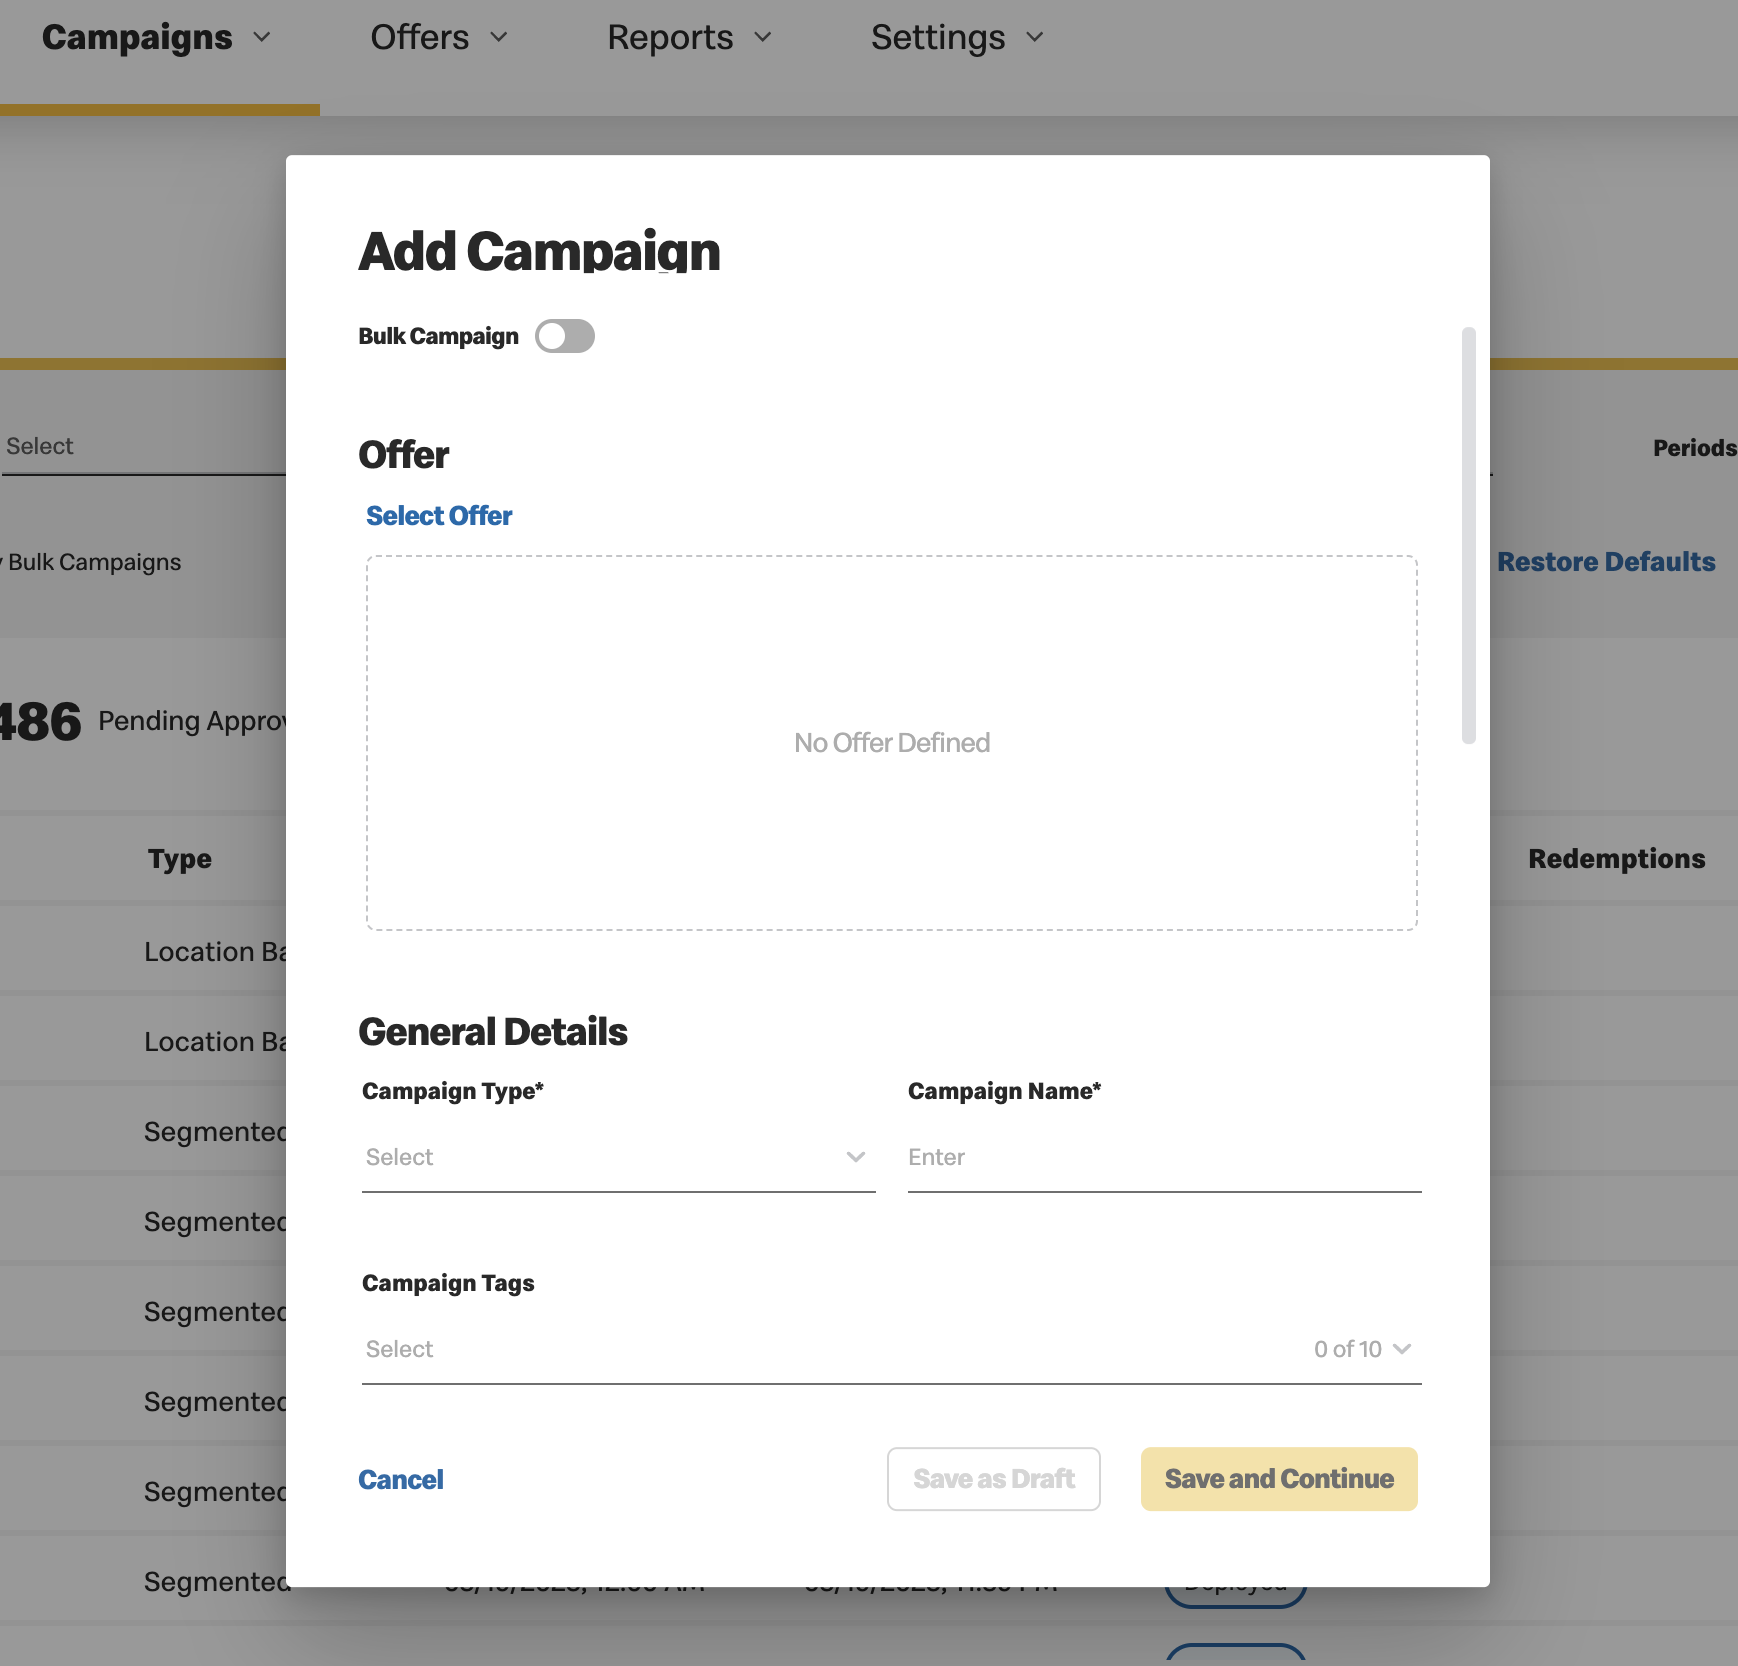
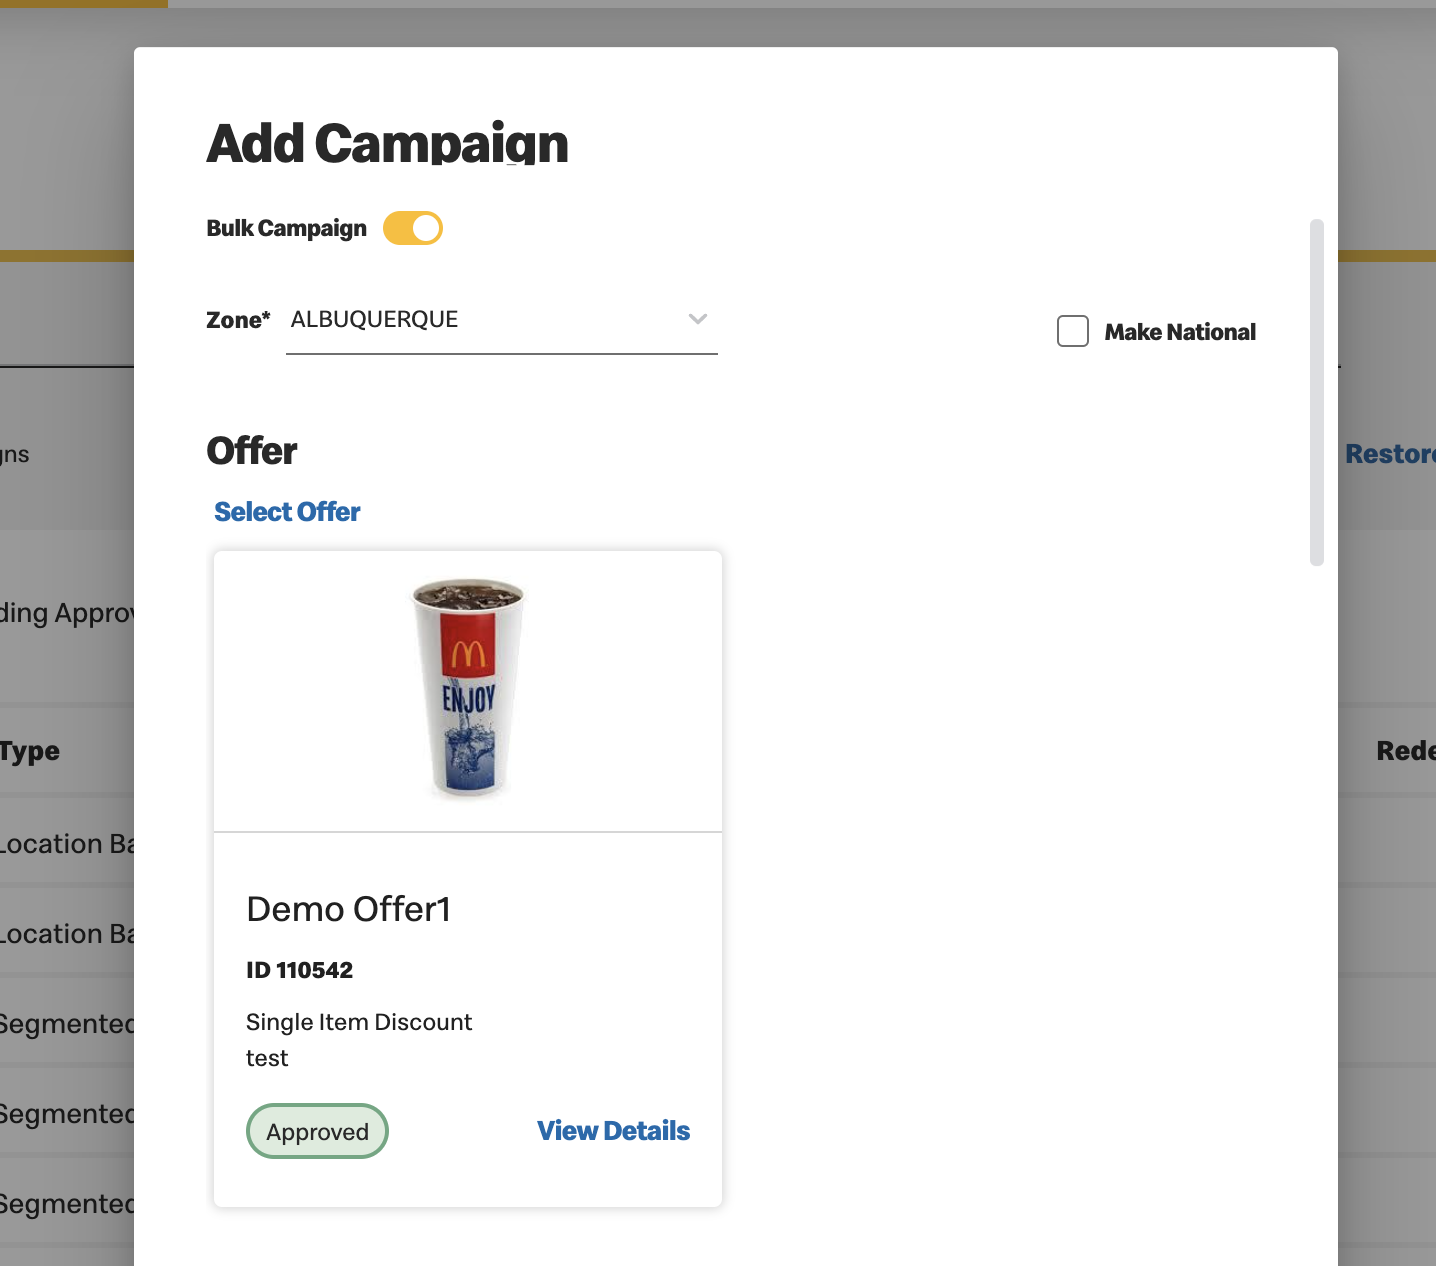
- Notice the Bulk Campaign toggle in the top of this window.

This is only available when the market is set for local management.
- If you toggle this ON, the Zone field is mandatory and the selected zone predefines the locations. All zone locations are included and are not editable.
- Select the zone from the dropdown menu. This is a partial list taken from the Zone section of Offers that includes only future periods that have not yet been approved for the selected zone.
- When selecting the Campaign Type only "Location Based" and "Segmented" are displayed.
- For more information on bulk campaigns, see section below
-
Next you must complete the mandatory fields:
-
Click on Select
Offer
- If you select an approved offer and complete the mandatory fields, you will be able to Save & Submit for Approval or Save as Draft.
- If you select an offer in pending approval and/or draft status, you can Save as Draft and only submit for approval once the offer has been approved.
-
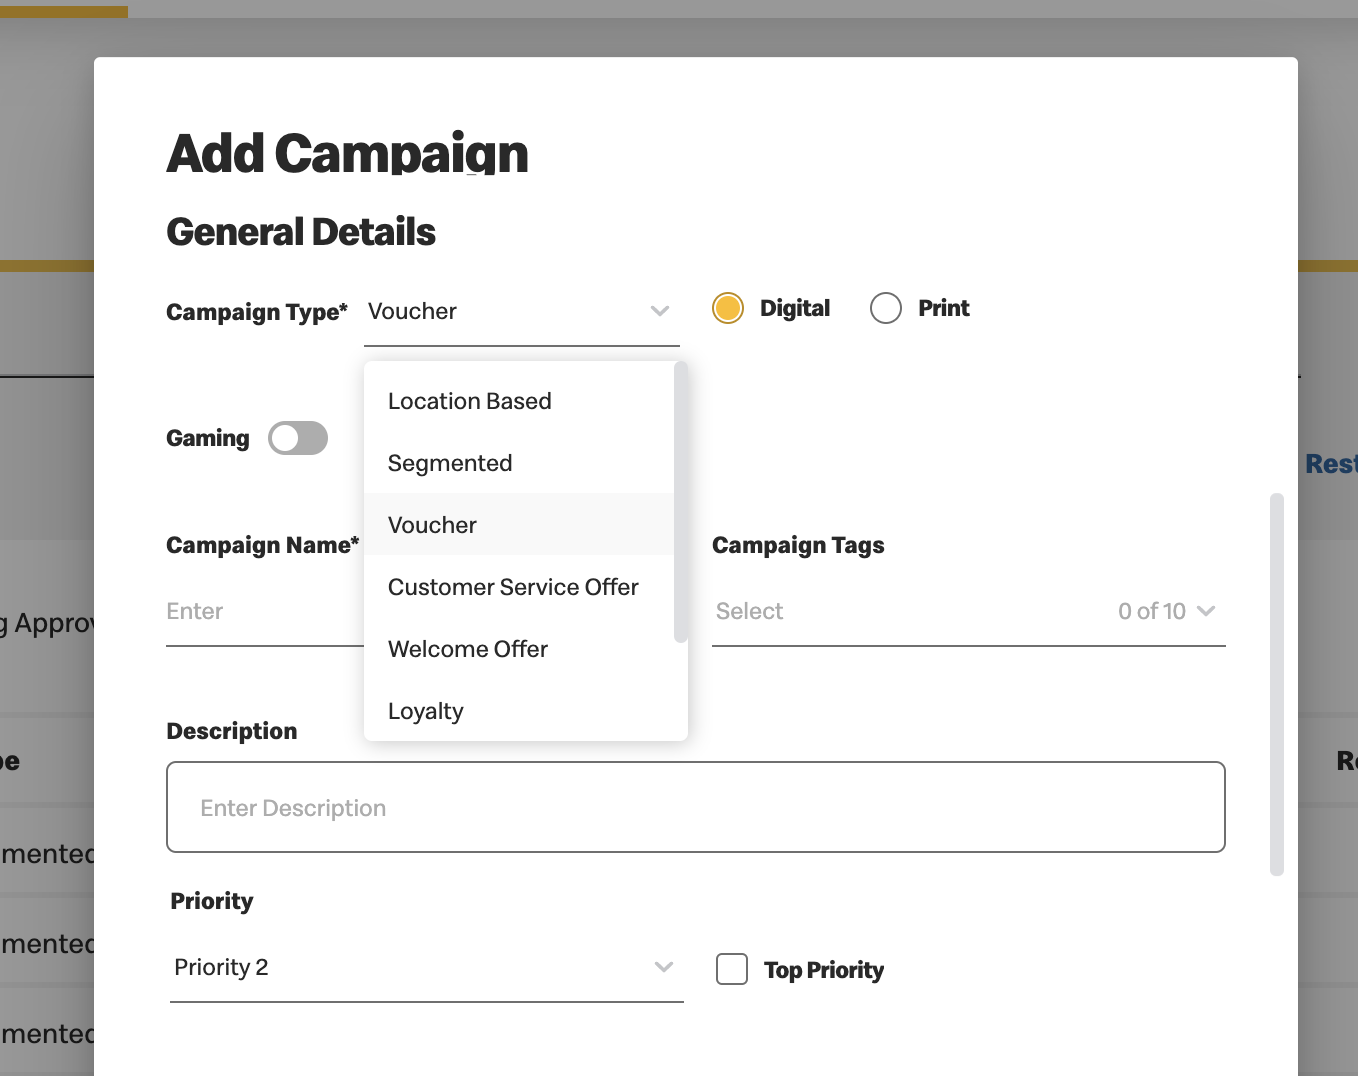
General Details:
- Select the Campaign Type from the dropdown menu
and enter a Campaign Name.
-
If you have selected Location Based or Segmented campaign types, you can select
the
 for a name to be automatically generated by
your VCE based on a predefined
template.
for a name to be automatically generated by
your VCE based on a predefined
template.
-
If you have selected Location Based or Segmented campaign types, you can select
the
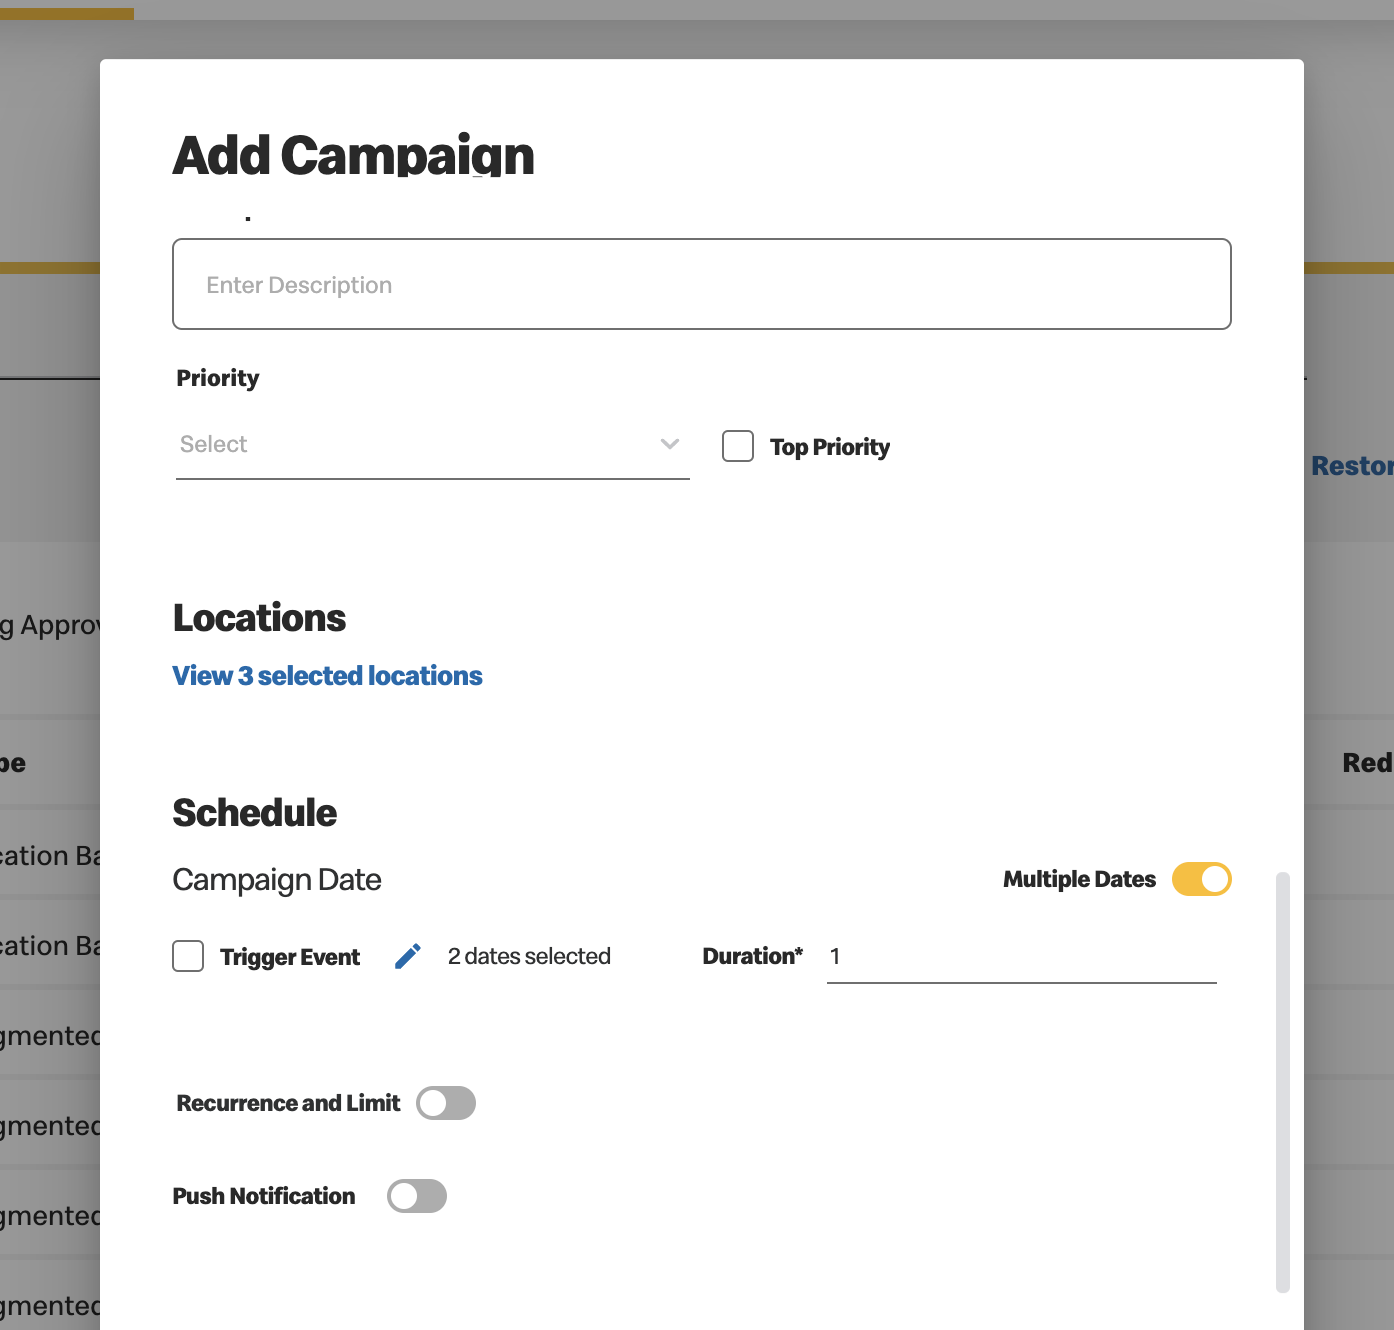
- The selection of up to 10 tags and a description are optional fields provided for your
benefit.
- Select the Campaign Type from the dropdown menu
and enter a Campaign Name.
-
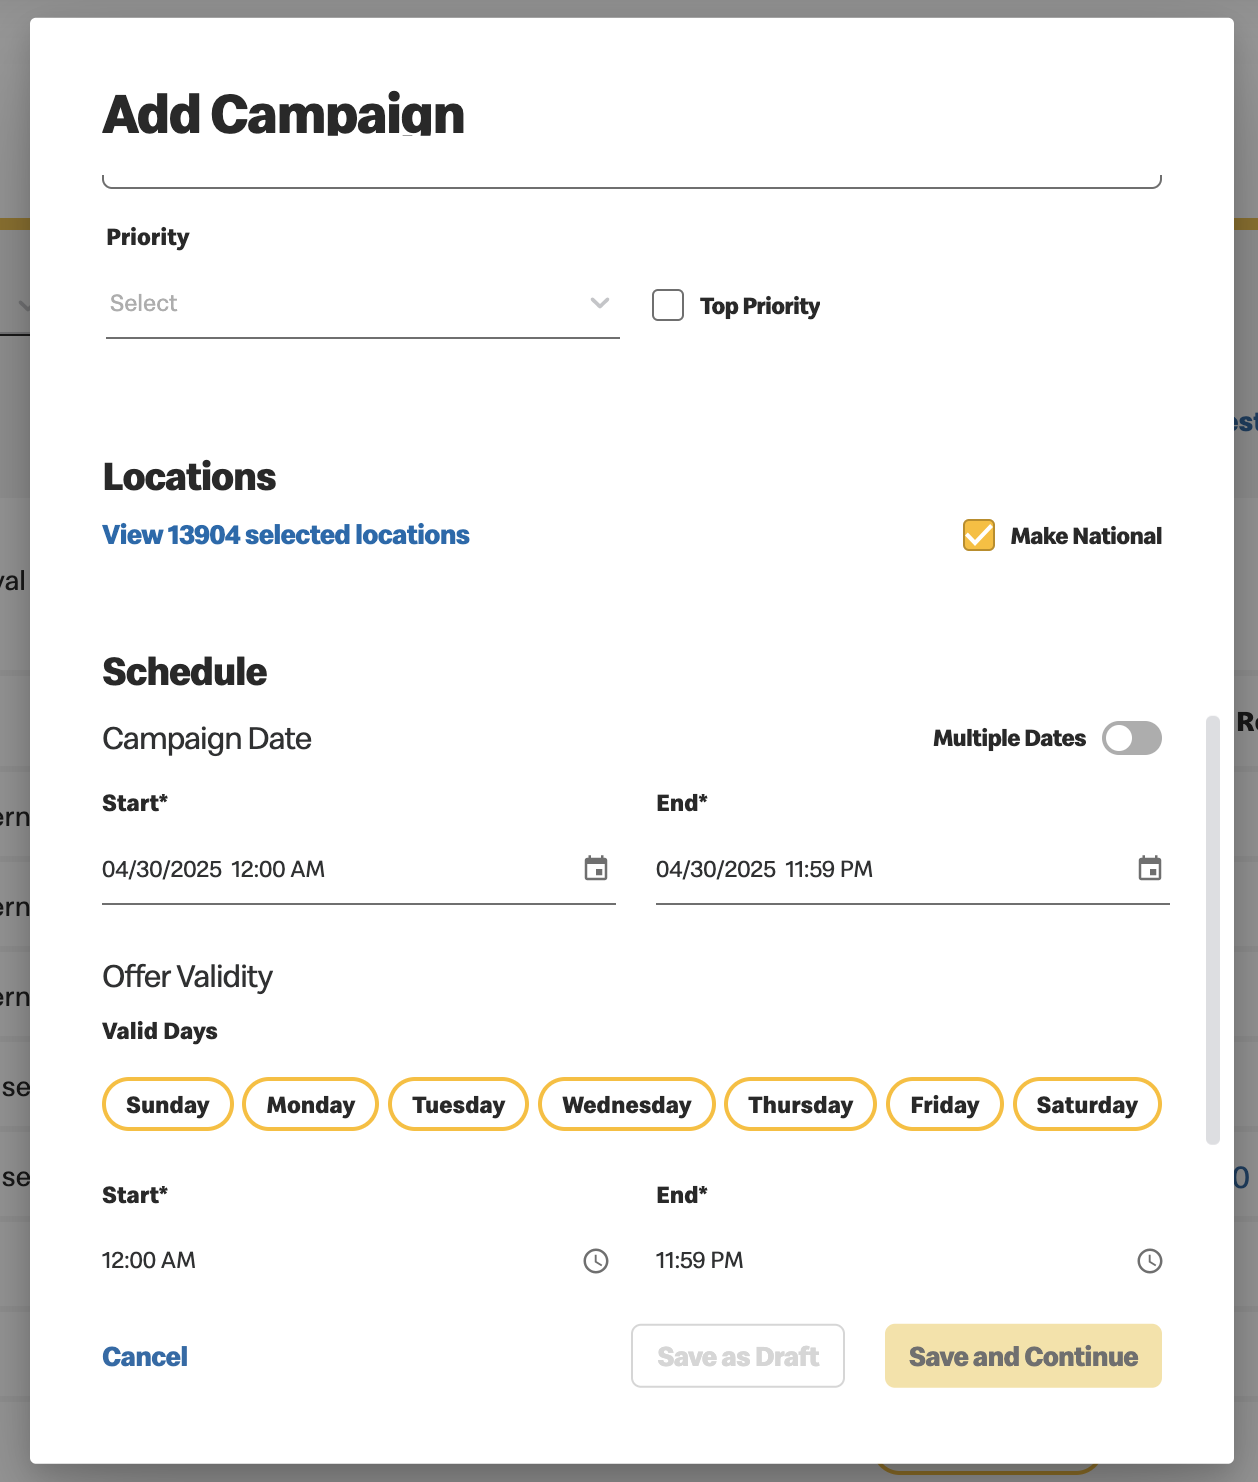
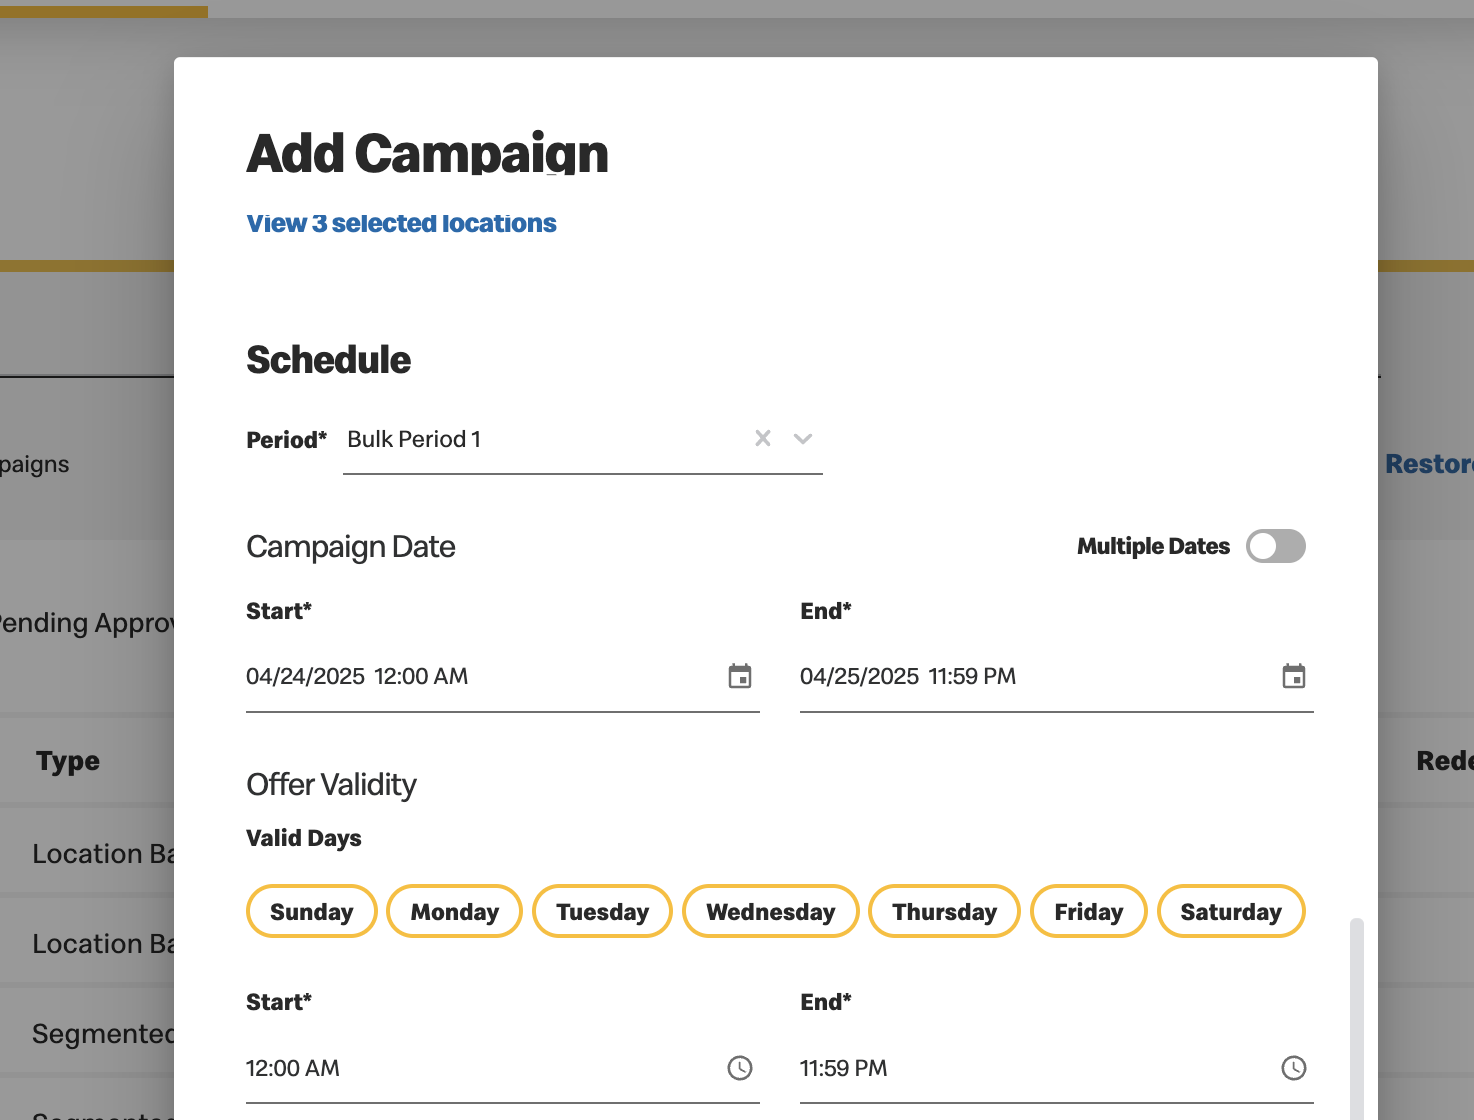
Schedule: You must define the start dates, end dates and more. Important to pay attention to
each mandatory field.
Fringe restaurants will be added automatically where relevant via the Custom Location Sets which allows you to confidently manage your offers and/or campaigns. For more information on Custom Location Sets, please click here. - If this campaign will run once, you must define the Start and End date and time.
-
If this campaign may run more than once, simply enable the Multiple Dates toggle and select
whether there is a trigger event that influences the start of the campaign.
If there is no trigger event, the campaign will begin on the date selected.
When there is a trigger event, the campaign will begin the day following the event.
For example, if the campaign is only valid when the Green Bay Packers win the Sunday game, then you must select the event dates accordingly and the duration (How many times this campaign can be redeemed). The campaign start date will begin on the following day.
When there is a trigger event, the campaign will not automatically deploy upon approval. It remains in Approval status until it is manually deployed. 
- Define the Offer Validity days of the week and time. Offer validity allows you to customize what days of the week or times of day that customers can use the offer.
- For example, if an offer is only valid for weekday breakfast, you can set the offer validity dates to Monday through Friday and the offer validity time from 7am to 11am so that customers can only use the offer during those conditions.
- Define the recurrence and limit. This allows you to customize whether this campaign can be redeemed daily, weekly, monthly or on a lifetime basis and the limit of how many redemptions. Notice dependent fields that appear based on your selection.
- For example, if an offer can be redeemed twice a day, then the recurrence would be set to Daily and the limit to 2 redemptions.
- To define further redemption limits, multiple Recurrence and Limit rules can be set. For example, if an offer can be redeemed 7 times within a week but only once per day, set one recurrence rule to Weekly with a limit of 7 redemptions and add another recurrence rule set to Daily with a limit of 1 redemption.
- Optionally you can define push notifications. See more details in Push Notifications
- Locations: Select the locations where the campaign will be valid
Notice the left and right pane. Select from the available Custom Sets, Locations or Location Groups.
If the campaign type chosen is NED (National Employee Discount), then a list of restaurants that offer NED will be auto-populated by default. This list is un-editable and is updated daily to ensure only relevant locations receive the offers and/or campaigns.
Fringe restaurants are locations that are near/bordering two areas or zones. These restaurants are set up to be added automatically to relevant bordering zones/areas. Fringe restaurants can be added directly via Locations in Campaign creation or via the Custom Location Sets which allows you to confidently manage your offers and/or campaigns. For more information on Custom Location Sets, please click here Notice the search bar at the top of each pane, this allows you to search via:
Click
 to display the set details.
Click
 on the desired Sets, Locations and/or Groups under Available
Locations to transfer your selection to the Selected
Location pane.
on the desired Sets, Locations and/or Groups under Available
Locations to transfer your selection to the Selected
Location pane.Click
 to
remove a Set/Location and the items are returned to the right pane.
to
remove a Set/Location and the items are returned to the right pane.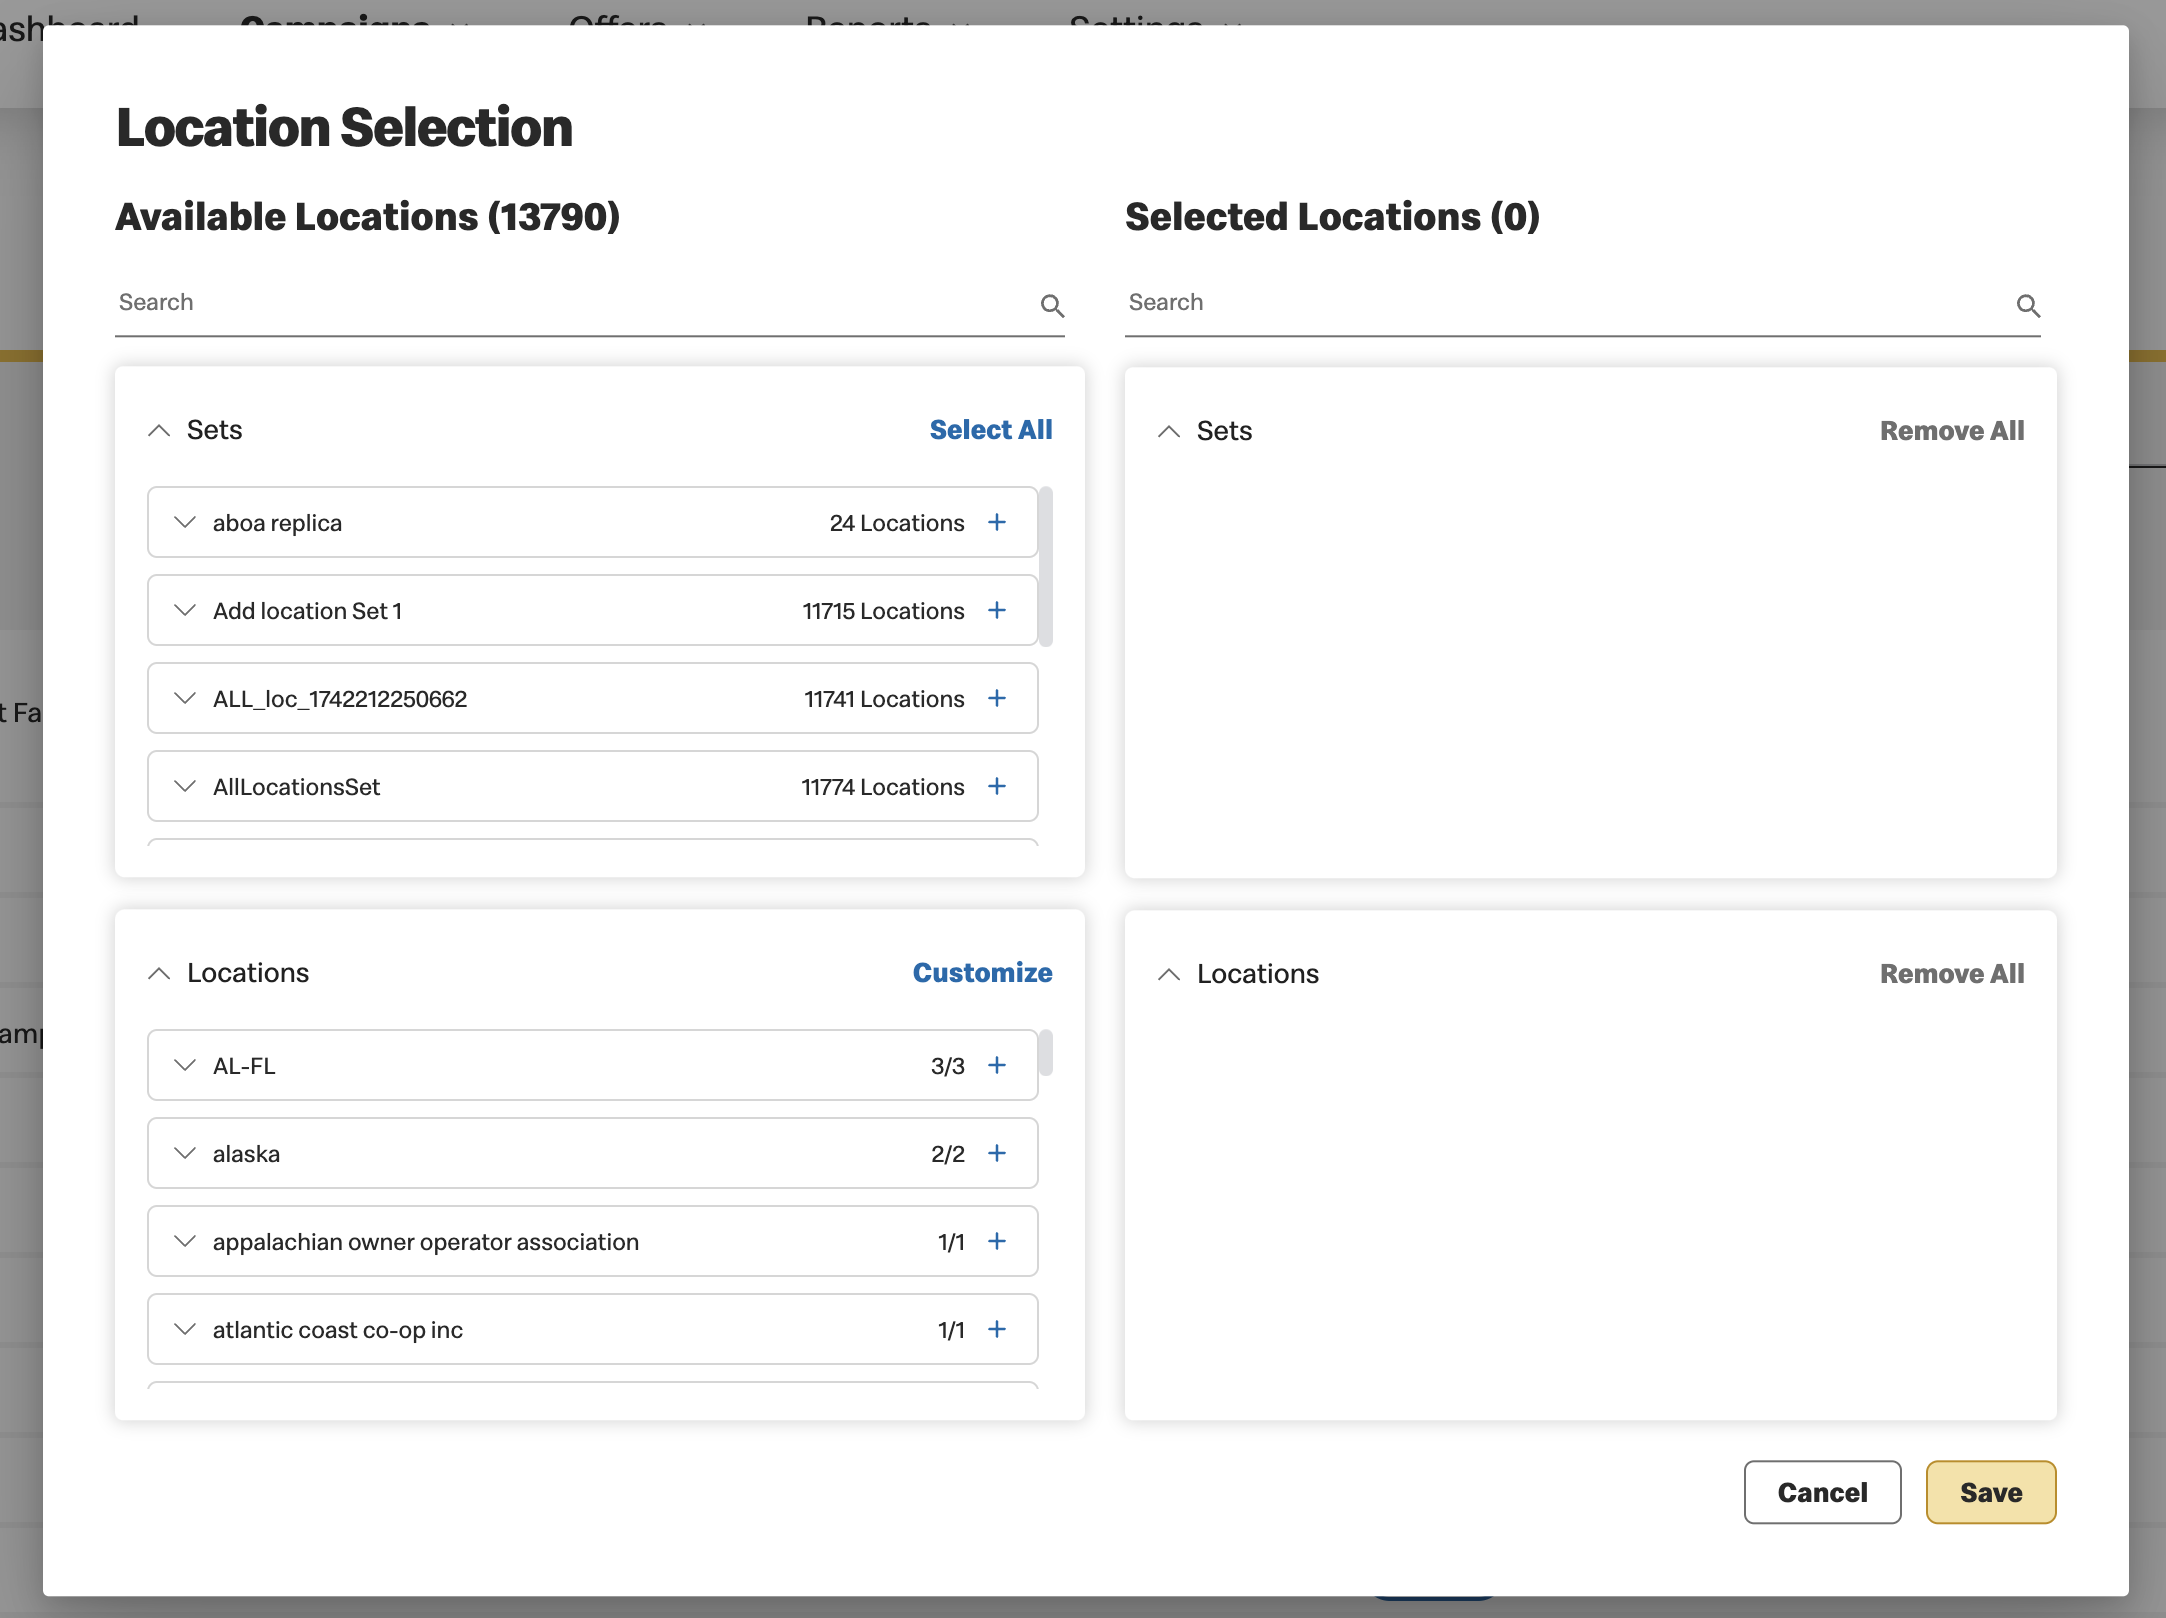
Alternatively, you can create a campaign that will be valid at all locations by checking the “Make National” checkbox. If new zones or restaurant locations are added to VCE, a campaign marked as “Make National” will automatically update to include these locations.
-
Click on Select
Offer
Once all the information has been entered, you can Save & Submit for Approval or Save as Draft to
continue at a later time.
Deal Priority Configuration
-
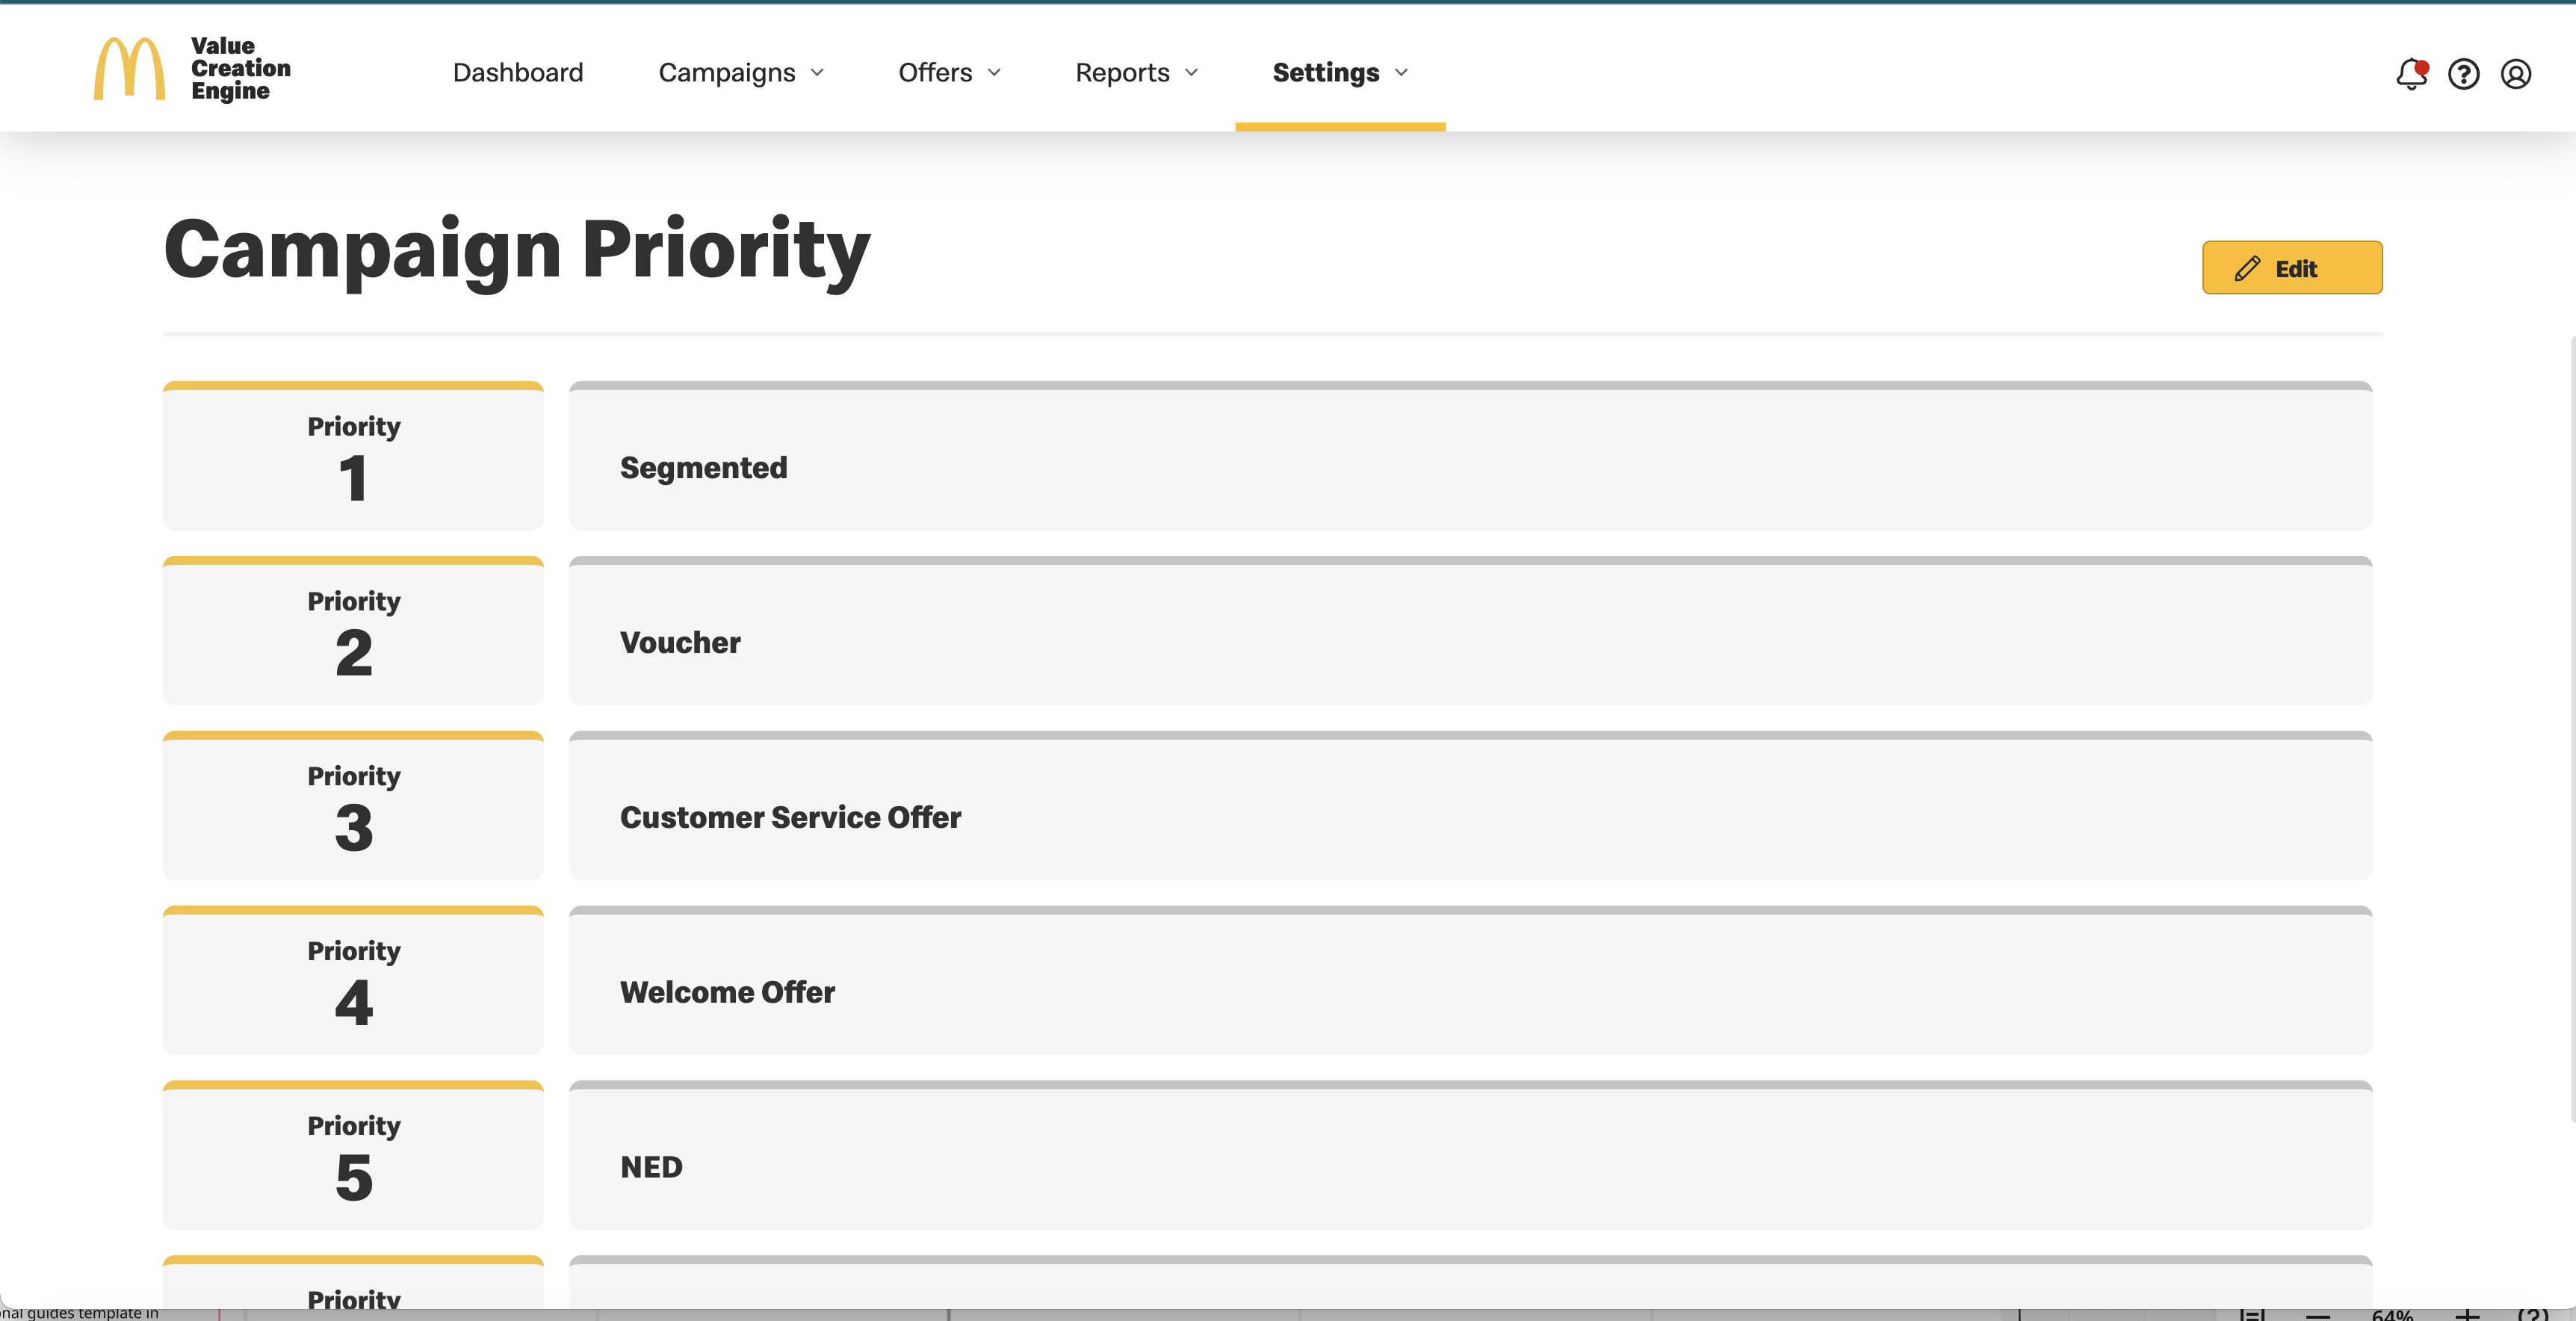
Configuring Priority of Campaigns:
Deal priority is managed at the campaign level. Navigate to "Settings" and select "Campaign Priority". This section allows you to view and adjust the default campaign settings. Admin users can click the edit button to drag and rearrange campaign types in ascending order by level of importance, setting their priorities to ensure high-priority campaigns (i.e. P1) are highlighted at the top of the GMA Deals list. After making changes, remember to save or cancel to maintain your preferences. Note, this feature is only applicable to GMA; Kiosk priority is out of scope at this time. Additionally, BAU and DOE segmented campaign priorities can now be configured separately, allowing distinct priority settings for each.
-
Campaign Creation Screen:
When creating a campaign, you'll find a "Priority" dropdown and a "Top Priority" checkbox on the creation screen. The Priority field is set automatically once the campaign type is selected and based on its default configuration but can be overridden manually. Marking a campaign as "Top Priority" ensures it gets the highest visibility. Note that for “Loyalty” campaigns, these priority settings are hidden at this time and will be considered a Phase 2 enhancement. Modify and save these fields as needed to customize campaign visibility.
-
Managing Campaign Priority View:
On the campaign management screen, use the "List by campaign priority" toggle button to switch to priority view mode. This mode displays a "Priority" column and disables other sorting options, ensuring top priority campaigns are always listed first. You can search, filter, perform bulk actions, and download results while in priority view mode, making it easy to manage your campaigns effectively.

Bulk Campaigns
Bulk Campaigns align with a specific zone and/or schedule period. When assigning bulk campaigns to a period, this allows for easier management in Schedule Management when creating campaigns in advance. If you want to create a bulk campaign or campaigns with a schedule period, there are three ways to do so: one bulk campaign with a zone or national association, bulk campaigns with multiple dates, and bulk campaigns with trigger events.
- If you want to create one bulk campaign with a zone or national association:
- After toggling on “Bulk Campaign,” either select a zone from the dropdown or check “National”
- Select a period from the period dropdown menu
- Select a start date that is within the selected period. The end date selected can be within or outside the selected period as long as it is after the start date
- The campaign will be able to be seen in schedule management. See the Schedule Management section for more details
- If you want to create bulk campaigns with multiple dates or with trigger events (period assigned):
- After toggling on “Bulk Campaign,” either select a zone from the dropdown or check “National”
- Select a period from the period dropdown
- Toggle on Multiple Dates
- If you want to create trigger event campaigns, also check the “Trigger Event” box
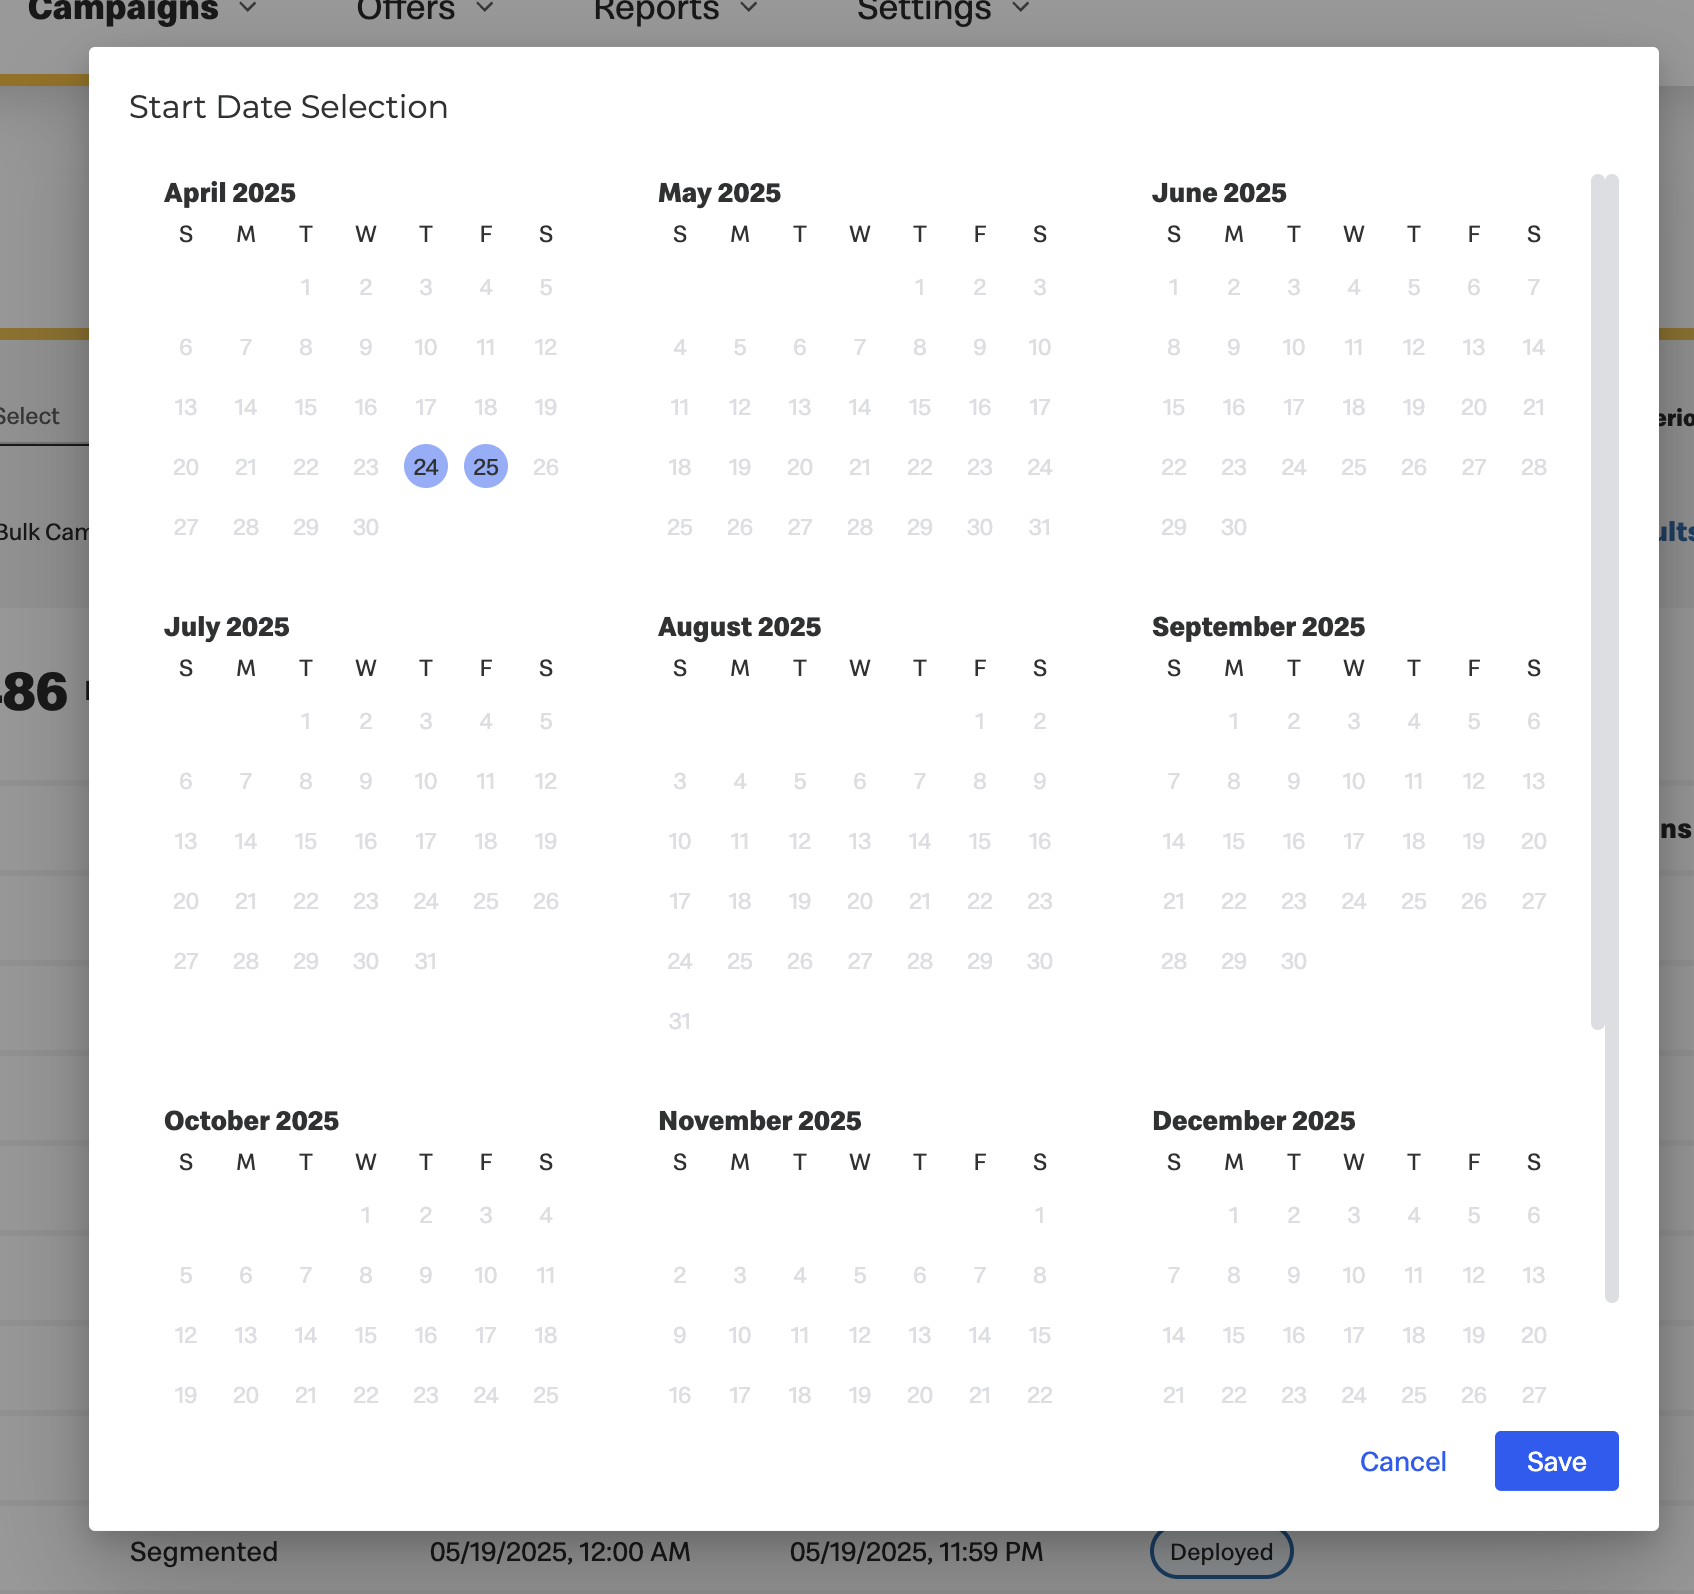
- Choose “Select Dates” to choose multiple dates.
- For trigger event campaigns, the campaign start date will be the day after the selected trigger date
- You can only choose start dates that are the current date or later
- If the start dates are not within the period, the campaigns will be auto-assigned to a period that aligns. If there is no period that aligns with the dates, it can not be submitted for approval
- These campaigns will be able to be seen, submitted for approval, and approved in schedule management. Once trigger event campaigns are approved, you can manually deploy them in campaign management. See the Schedule Management section for more details on submitting and approving these campaigns.
- If you want to create bulk campaigns with multiple dates or with trigger events without a period (no period assigned):
- After toggling on “Bulk Campaign,” either select a zone from the dropdown or check “National”
- Do not select a period from the period dropdown
- Toggle on Multiple Dates
- If you are trying to create trigger event campaigns, also check the “Trigger Event” box
- Choose “Select Dates” to choose multiple dates.
- You can only choose start dates/trigger event dates that are the current date or later
- For trigger event campaigns, the campaign start date will be the day after the selected trigger date
- These multiple date campaigns will only be seen in Campaign Management and submitted for approval and approved like non-bulk campaigns. Once trigger event campaigns are approved, you can manually deploy them in campaign management.


Only bulk (or national) campaigns with multiple dates and bulk campaigns with trigger events may be created without a schedule period association. This allows for choosing campaign start dates that are not all restricted to one single period.


Bulk Campaign Creation and Approval Process
- Initial Process:
- When you start the bulk creation, submission, or approval of campaigns, the system begins processing your request.
- If this process takes more than 15 seconds, you will receive a notification indicating that the "Campaign Creation/Submission/Approval process is received".
- Notifications During the Process:
- While the campaigns are being processed, you can continue working on other tasks within the application.
- The campaigns currently being processed will be locked from re-submission, editing, or archiving until the process is complete.
- Completion of Process
- Notifications Upon Completion
- Once the campaign creation, submission, or approval process is complete, you will receive notifications about the outcome:
- Email Notification: Sent to all users who have opted in for campaign notifications.
- In-App Notification: Received by all users within the application.
- Accessing the Campaigns
- Clicking on the notification or the link provided in the email will navigate you to the Campaign Management screen.
- The screen will be filtered to show only the campaigns involved in the recent creation, submission, or approval process.
- Handling Unsuccessful Campaigns
- If any campaign creation is unsuccessful, you will be notified of the specific campaign(s) and the date of the failure.
- This allows you to address the issues and create the campaigns again.
- Avoid Multi-User Scenario
- Best Practice: It is advisable to avoid multiple users working on the same set of campaigns/offers/Terms&Conditions simultaneously.
- Reason: Concurrent modifications by multiple users can lead to conflicts, errors, or data integrity issues during the bulk creation, submission, and approval process.
|
|
Best Practices |
Push Notifications
You can create push notifications for any campaign so that customers will be reminded or notified about important information relating to specific campaigns or offers.
When creating a campaign, the "Push Notification" toggle will be at the end of the Schedule section. The default status will be off. To make a push notification:
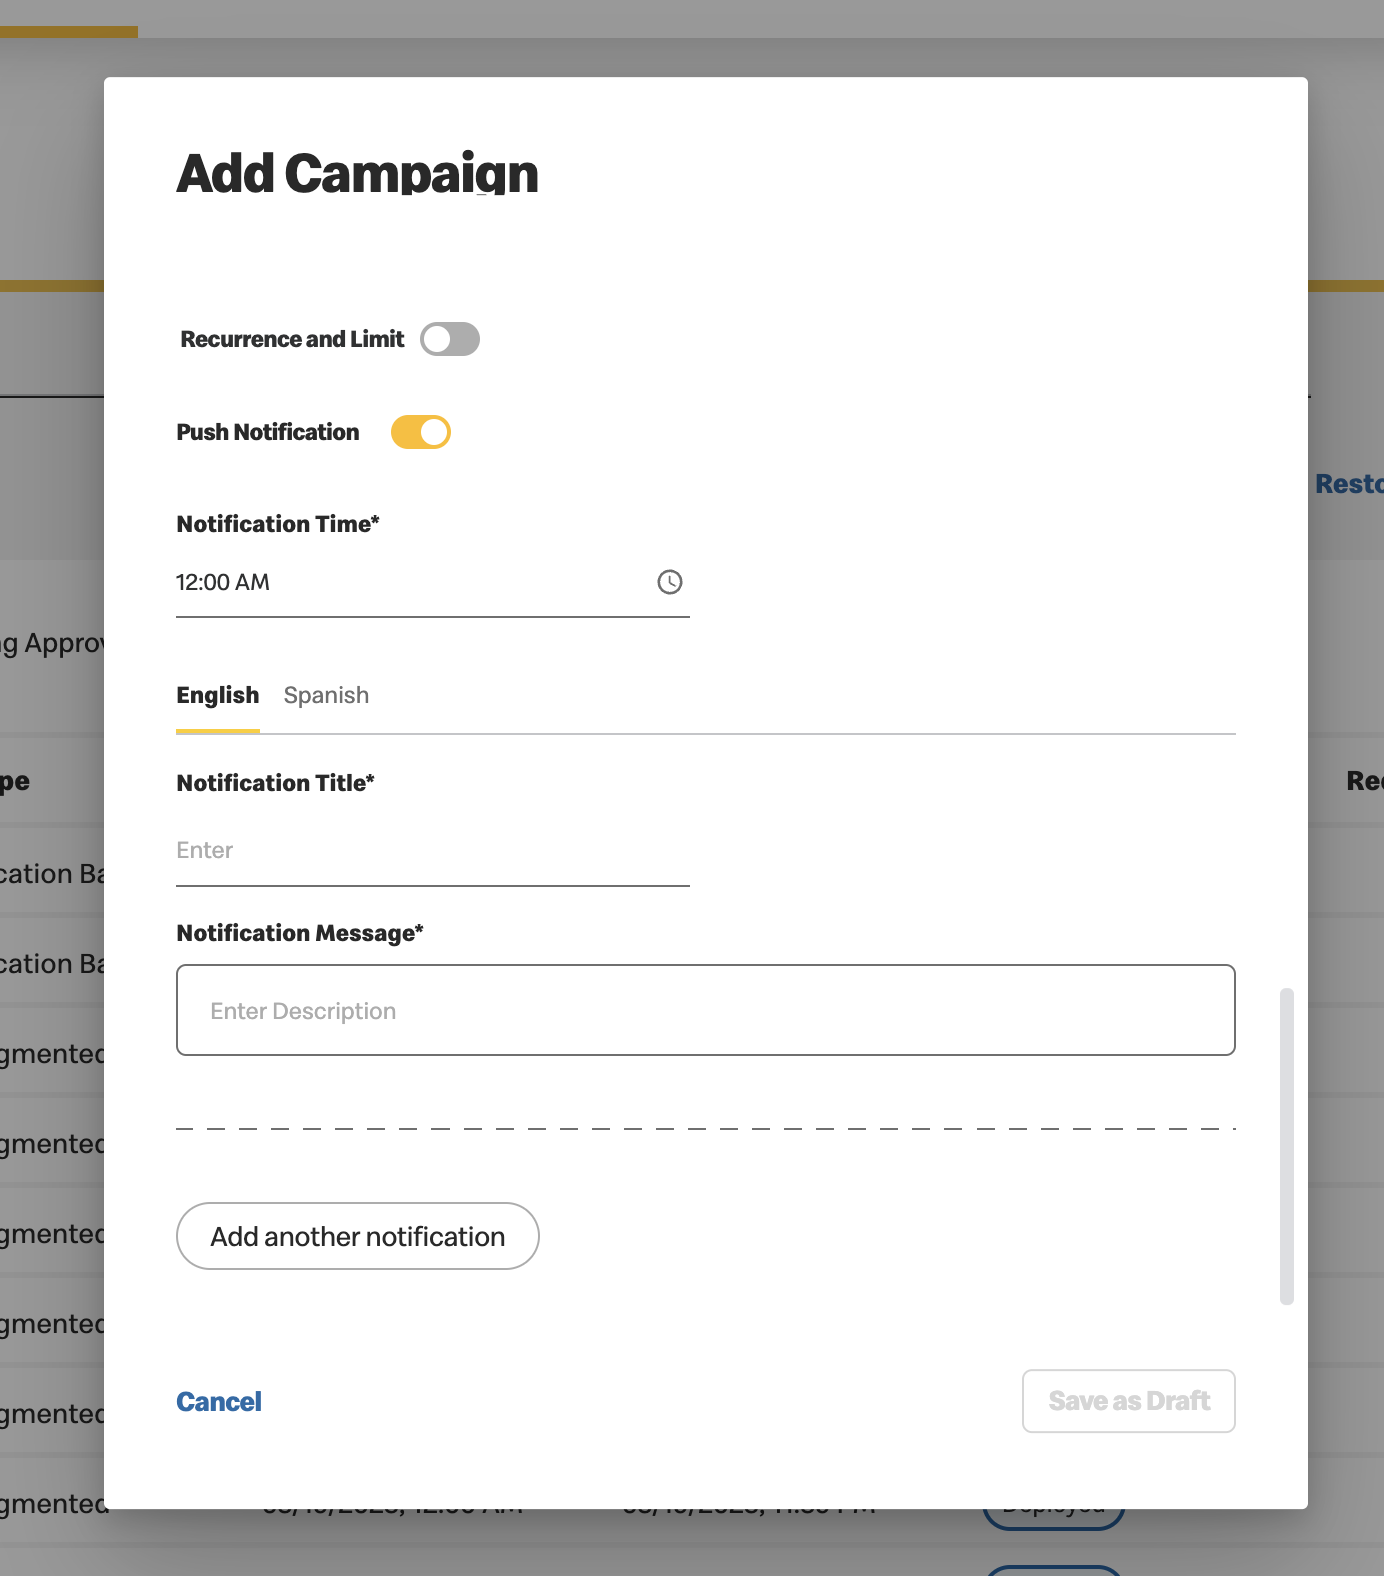
- Toggle on “Push Notification”
- Notification fields must be completed if the toggle is left on
- Set notification time
- The date and time is pre-populated, but you can edit this
- The notification date/time must be within the campaign start and end date/time
- There is a blocked-out time window from 7pm to 7:30am where push notifications will not be sent to customers. Any push notifications set between these times will not be sent.
- Fill in the primary language Notification Title and Notification Message
- Secondary language title and message may be required or optional depending on the market configuration
- After all other fields for the campaign have been completed, you can save or submit for approval.
Note: For multiple dates campaign creation, push notifications will need to be set for each campaign
separately in order for them to work. You can save the multiple dates campaigns as a draft and edit each
push notification on each campaign, so the push notification times are correct.
To edit or delete push notifications:
- For saved/approved/deployed/active campaigns, you can edit the details of the push notification by clicking “edit”, and then clicking “Save” once you have made changes
- For saved/approved/deployed/active campaigns, you can delete the push notifications by clicking “edit”, toggling off “Notifications”, and then clicking “Save”.
Push notification data is stored in VCE only and will not be passed downstream. You can view the push notifications either by clicking specific campaigns or in the calendar. Campaigns with push notifications will have a bell icon next to the title in the calendar.
Campaign Management
As we always strive to help you reach maximum efficiency, we keep your
campaigns landing page clean and clear of clutter by auto-archiving any campaigns that are no
longer in use.
(By default, this is set to archive any campaign that has not
been used in the last 6 months however this is configurable per market).
This relates to:
- Expired
- Revoked and
- Deployment Failed campaigns
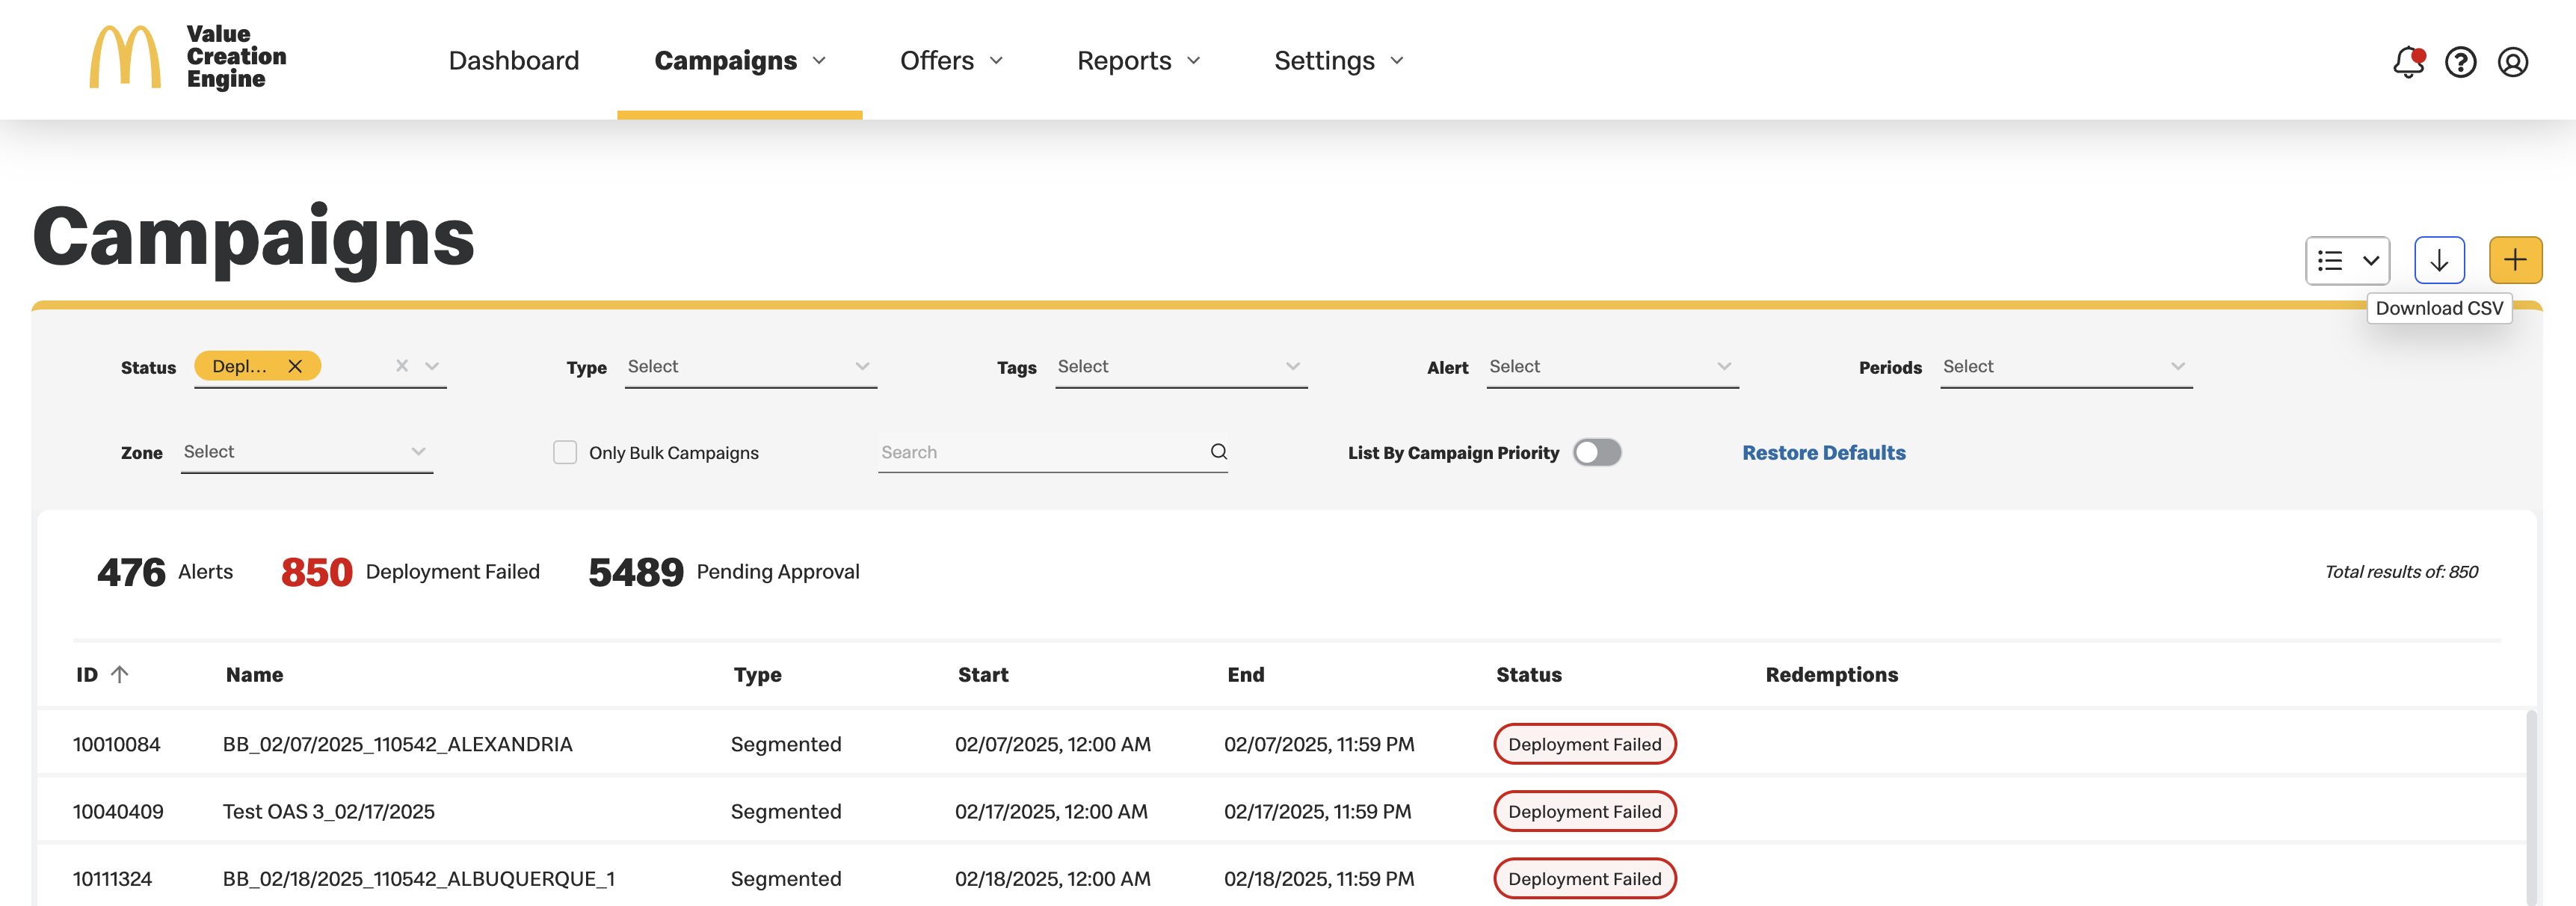
To assist with Campaign management, we provide numerous options. Let's begin with review of the filtering options. Choose to view all, or filter to focus on the Campaigns of interest.
By default, prior to entering filtering criteria, all non-archived
campaigns will be displayed.
You can chose to filter by:
- Status
- Type
- Tags
- Alert - See table below to understand the alert notifications as they relate to the campaigns
-
or search by key words such as:
- Campaign ID
- Campaign Name
- Campaign Description
- Restaurant Code
- Restaurant Name
- Offer ID
- Offer Title
- Product Code
- Product Name
- Underlying Image Name
- Underlying Image ID
-
Your search results display are based on the following criteria:
- Exact match of the Offer ID / Campaign ID
- Exact match of Campaign Title
- Exact match of Offer Title
- Partial match of Campaign Title
- Partial match of Offer Title
- Exact match of additional fields
- Partial match of additional fields
Alert notifications related to campaigns.
ALERT
DEFINITION
Update Failed
An attempt to update an active or deployed campaign failed, the original campaign is still active.
Revoke Failed
An attempt to revoke an active or deployed campaign failed, the original campaign is still active.
Stop Association Failed
A stop association command was sent to an active campaign however failed to stop the association. The campaign is still active and eligible customers will continue to receive the reward.
Conflicted
The campaign includes an offer which has not yet been approved. This is relevant for campaigns in the following statuses:
- Draft
- Pending Approval
- Rejected
|
|
After filtering your search, you can always select the Reset button to return to the Default menu
that displays all non-archived campaigns. The filter results are displayed based on an OR condition by default. If you require results based on an AND condition, please contact the VCE Product Team for assistance. |
Notice the Campaigns we have marked for you:

Hover over any title to be taken directly to the relevant index page.
After selecting which campaigns are of interest, hover over any row to display the two management tools.
-
Click
 to view the campaign details (Review the table below that defines the actions that can
be performed based on campaign status).
to view the campaign details (Review the table below that defines the actions that can
be performed based on campaign status).
-
Click
 to
edit all fields in the current campaign selected.
to
edit all fields in the current campaign selected.
-
Once you make any changes, select:
- Cancel - To discard changes.
- Save & Submit for Approval
- Save as Draft - To complete at a later time.
-
Once you make any changes, select:
The table below reflects the actions that can be performed based on status. Below the table is a
description of the actions.
| STATUS |
EDIT
|
REVOKE |
ARCHIVE
|
UNARCHIVE
|
DUPLICATE |
REJECT
|
APPROVE |
SUBMIT FOR APPROVAL
|
STOP ASSOCIATION
|
DEPLOY |
|
DRAFT
|
√
|
√
|
√
|
√
|
||||||
|
PENDING APPROVAL
|
√
|
√
|
√
|
√
|
√
|
|
||||
|
APPROVED
|
√
|
√
|
√
|
√
|
√ |
|||||
|
DEPLOYED
|
√
|
√
|
√
|
|
||||||
|
ACTIVE
|
√
|
√
|
√
|
√
|
||||||
|
EXPIRED
|
√
|
√
|
||||||||
|
REVOKED
|
√
|
√
|
||||||||
|
DEPLOYMENT FAILED
|
√
|
√
|
||||||||
|
REJECTED |
√
|
√
|
√
|
√
|
||||||
|
ARCHIVED
|
√
|
Action:
-
Edit - Add/ delete/change details within a campaign. You cannot edit specific fields of active
campaigns. This includes:
- The offer
- Campaign type
- Campaign name
- Schedule details
- Revoke - Remove an active offer from all wallets and prevent association of offer to any new customers. (This is usually necessary if an error was found in a campaign definition that cannot be corrected via editing. In most cases, a new version of the revoked campaign is deployed.
- Archive - Preserve all details of a campaign however remove from current available campaigns to be used.
- Duplicate - Create a copy of all details of an existing campaign and allow for editing to make changes as needed.
- Reject - Campaign cannot be used. You can enter the reason for rejection which allows the marketer to return to the campaign and edit details necessary to resubmit.
- Approve - Campaign is deployed (campaigns must be in approved status to be deployed). Campaign will be active as soon as it reaches its start date and time.
- Submit for Approval - To determine if campaign meets all requirements and is ready to be approved.
- Stop Association - Allows marketers to prevent a campaign from being associated to any newly eligible customers, while keeping the campaign valid in the offer wallets of the customers whom already received it.
- Deploy - When there is a trigger event, the campaign will not automatically deploy upon approval, it remains in approval status until it is manually deployed.
Notice the  icon in the upper right corner of this index
page. From here you can:
icon in the upper right corner of this index
page. From here you can:
- Bulk Submit for Approval
- When you select Bulk Submit for Approval, all campaigns in draft status are
automatically filtered in addition to any predefined filters.
- You can deselect any of the Campaigns you wish to omit.
- Once you click "Submit for Approval" a toast will update you of how many campaigns are selected
for approval and whether campaigns have been excluded. Reason for exclusion include:
- Campaign defined as "Local"
- Conflicted Campaigns
- Invalid Campaigns (for example: if the campaign start date has already past)
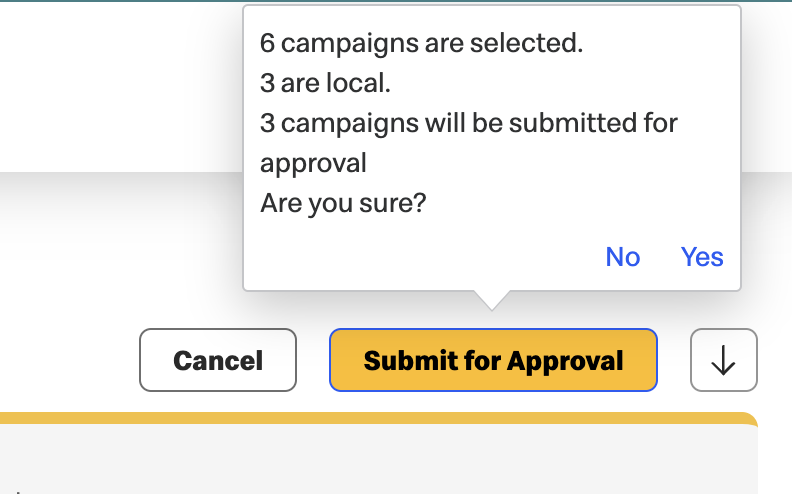
- Before completing this action, a "Yes, Submit for Approval" question appears to confirm you wish to proceed.
- If you select "No" you can click "Cancel" to cease the Submit for Bulk Approval process.
- When you select Bulk Submit for Approval, all campaigns in draft status are
automatically filtered in addition to any predefined filters.
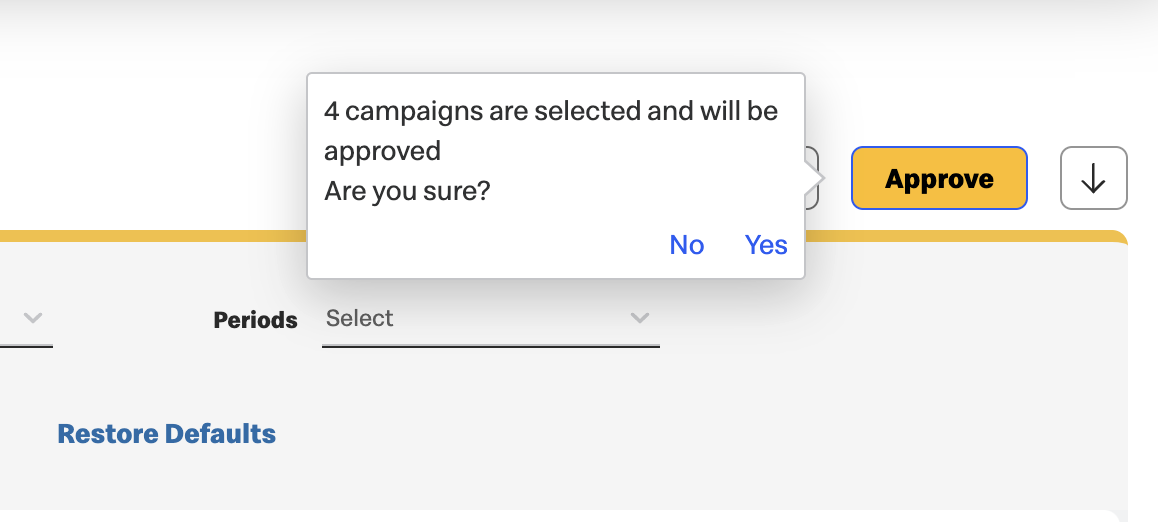
- Bulk Approve
At any time after selecting a Bulk action, a "Cancel" button is always displayed to exit this process. - When you select Bulk Approve, all campaigns in Pending Approval status are
automatically filtered in addition to any predefined filters.
- You can deselect any of the Campaigns you wish to omit.
-
Once you click "Approve" a toast will update you of how many campaigns are selected for approval and whether campaigns have been excluded. Reasons for exclusion include:
-
Campaign defined as "Local"
-
Conflicted campaigns
-
Invalid Campaigns (for example: if the campaign start date has already past)
-
Campaigns submitted for approval by user whom created the campaign, exception being when "Self Approval" is enabled for Administrators in a specific market
-
-
Before completing this action, a "Yes, Approve" question appears to confirm you wish to proceed.
- If you select "No" you can click "Cancel" to cease the Bulk Approval process.
- When you select Bulk Approve, all campaigns in Pending Approval status are
automatically filtered in addition to any predefined filters.
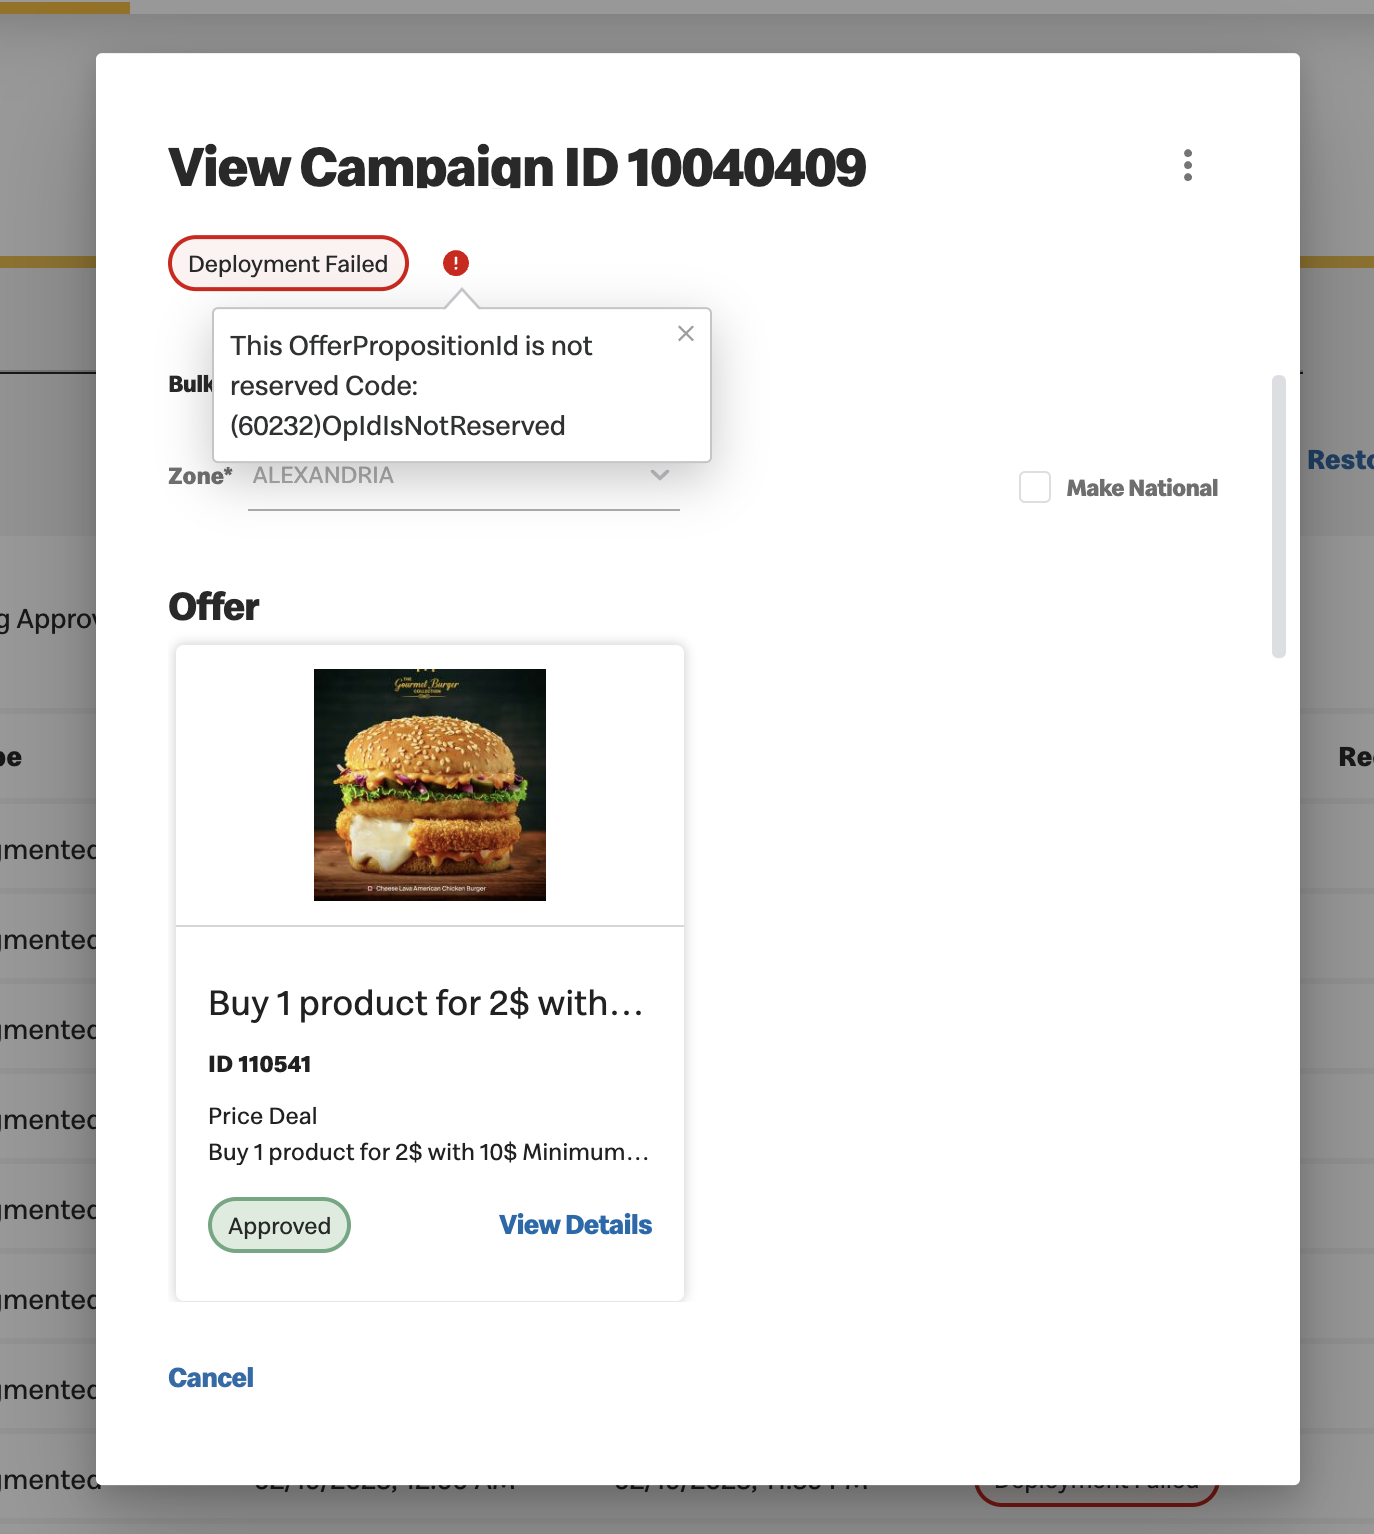
Retry Option for Failed Campaign Deployments
In case a campaign deployment fails, marketers can now redeploy the campaign without needing to create a new one. This feature allows for up to three retry attempts for campaigns that fail deployment due to eligible error codes. The retry option will be visible for campaigns that are eligible for redeployment, based on factors like start date and error code.
For each attempt, users will receive a deployment status message indicating either success or failure, after which the campaign view will close.
Exporting Campaign Data
To have all campaign data exported to a CSV/Excel Spreadsheet click the download button in the top right corner of the campaign management page.
- The file will include all campaign information except Campaign Tags, Campaign Description, and Locations.
- Zone will be captured for Local Campaigns.
- Push Notification Title and Message in both primary and secondary languages and the Push Notification Time and Date will be captured.
- If edits are made to campaigns before exporting, then the exported document should reflect the updates.
IWin Campaign
How to Create iWin Campaign:
- Click on the "Campaign Management" submenu.
- Click the "+" icon to display the "Add Campaign" details window.
- Click on "Select Offer."
- If you select an approved offer and complete the mandatory fields, you will be able to "Save & Submit for Approval" or "Save as Draft."
- If you select an offer in pending approval and/or draft status, you can "Save as Draft" and will only be able to submit for approval once the offer has been approved.
- Once you have selected the "+" icon and the base offer, select the "Voucher Campaign Type" and enter a
"Campaign Name."
-
A Gaming toggle will appear under the Campaign Type. Toggle this ON.
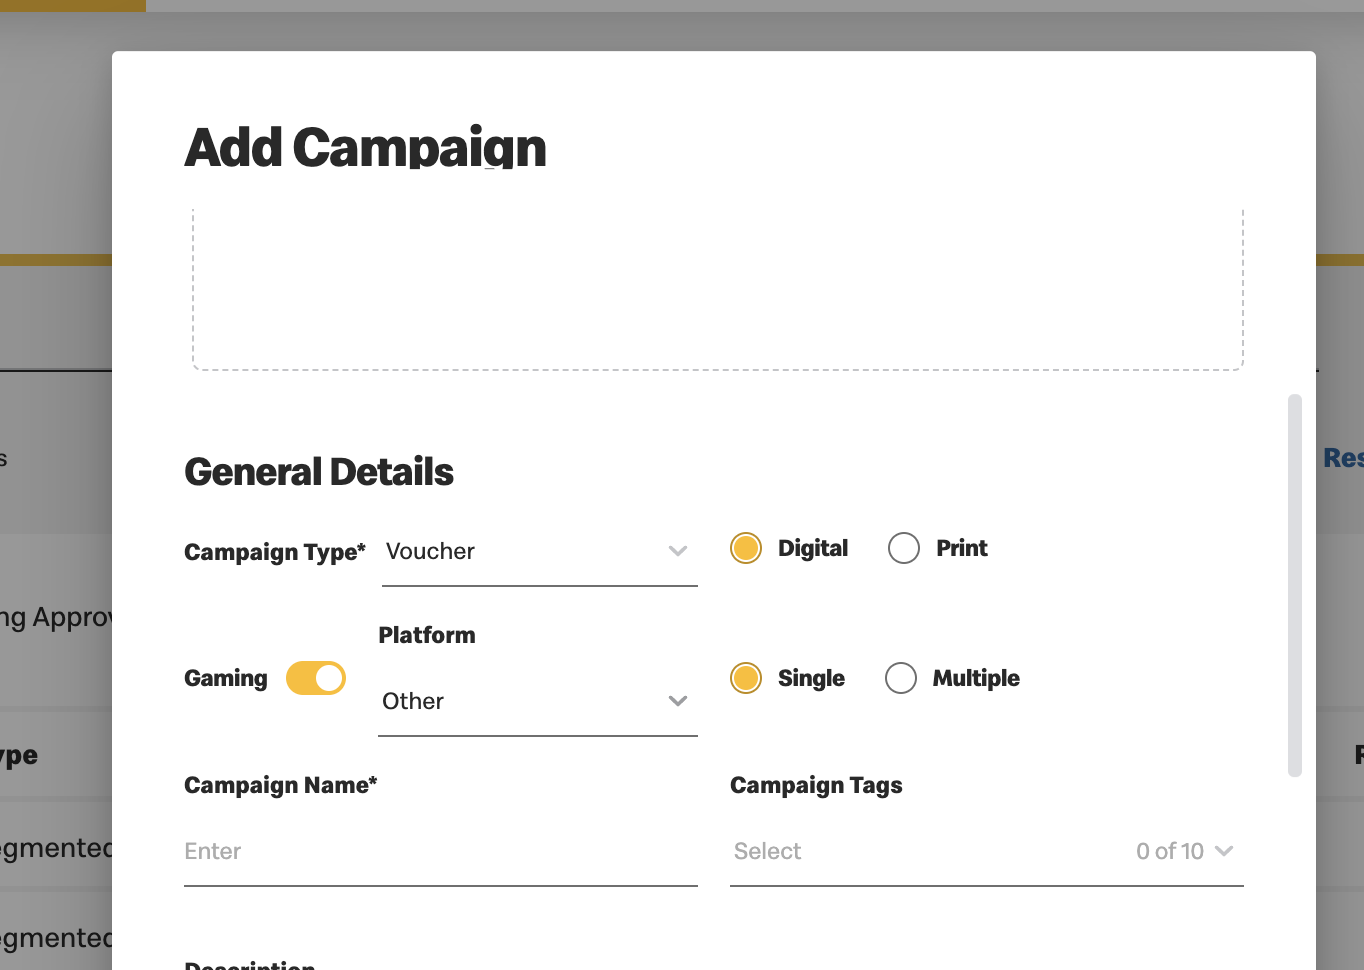
- Choose the type of gaming voucher:
- Single Vouchers: Also known as "instant win" because only one voucher is needed to redeem a prize
- Multiple Vouchers: Also known as "collect-to-win" because multiple matching vouchers are needed to redeem a prize
- Choose "iWin" under the dropdown for "Platform." This will load new dropdown fields for "Game" and
"Quantity."
Note: The Game dropdown allows you to choose the game associated with the campaign.
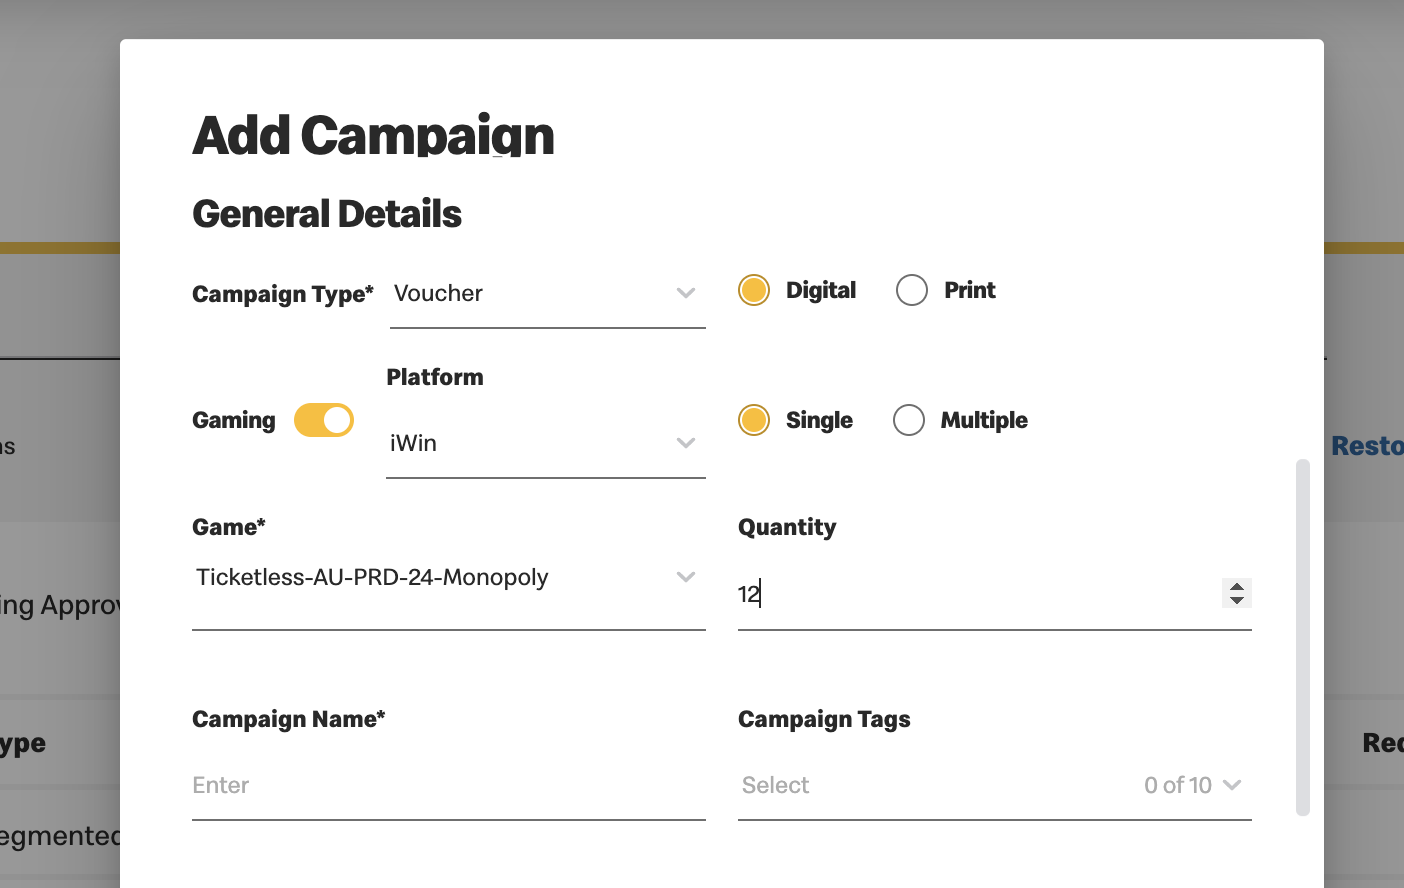
- Choose or define optional fields:
- Quantity: Choose how many vouchers are available to redeem. If left empty, an unlimited quantity of vouchers is available.
- Campaign tags: Choose up to 10 tags to associate with the campaign.
- Description: Write a description of the campaign.
- Fill out the schedule details:
- Campaign Start Date: Must be before the Game End Date.
- Campaign End Date: Must be after the Campaign Start Date and Game Start Date
- The calendar will automatically block out dates that are before the current date and past the Game End Date when initially choosing the Campaign Start Date.
- Select the locations where the offer will be available at predefined restaurants. The Game will have a select list of locations associated with it.
- Once all the information has been entered, you can "Save & Submit for Approval" or "Save as Draft" to continue later.
Other Actions:
- Edit:
- Click "Edit" to edit an existing gaming campaign.
- The game cannot be changed.
- Quantity:
- Cannot be changed if the Game is live (if the current date is at or after the game start date).
- Cannot be changed if undefined (e.g., unlimited), even if the Game is not live.
- If the Game is not live, only an increase in quantity is supported. If a lower value is entered, the field is marked in red.
- End date/time cannot be changed if the Game is live (if the current date is at or after the game start date).
- Locations are editable within the payload provided in the game details.
- Duplicate
- You can create a duplicate of an existing gaming campaign by clicking “Duplicate”
- Duplicates have the same validation for start/end dates
- The name cannot be the same
- Reject:
- When a campaign has been submitted for approval, you can click "Reject" to reject the campaign.
- Revoke:
- When a campaign is active or deployed, you have the option to click "Revoke" to revoke the campaign.
- Only digital voucher type campaigns can be revoked.
- Archive/Unarchive:
- If a campaign is not active or deployed, you can archive it using the "Archive" button.
- An archived campaign can only be unarchived.
- Unarchiving the campaign will restore it to its original status.
Loyalty External Voucher Campaign
How to Create a External Digital Voucher Campaign:- Navigate to the "Campaign Management" submenu.
- Click the "+" icon to open the "Add Campaign" details window.
- Select "Offer":
- If you select an approved External digital reward offer and complete the mandatory fields, you can
either:
- "Save & Submit for Approval," or
- "Save as Draft."
- Note: The campaign start and end dates will auto-populate based on the selected digital offer’s voucher start and end dates.
- If you select an approved External digital reward offer and complete the mandatory fields, you can
either:
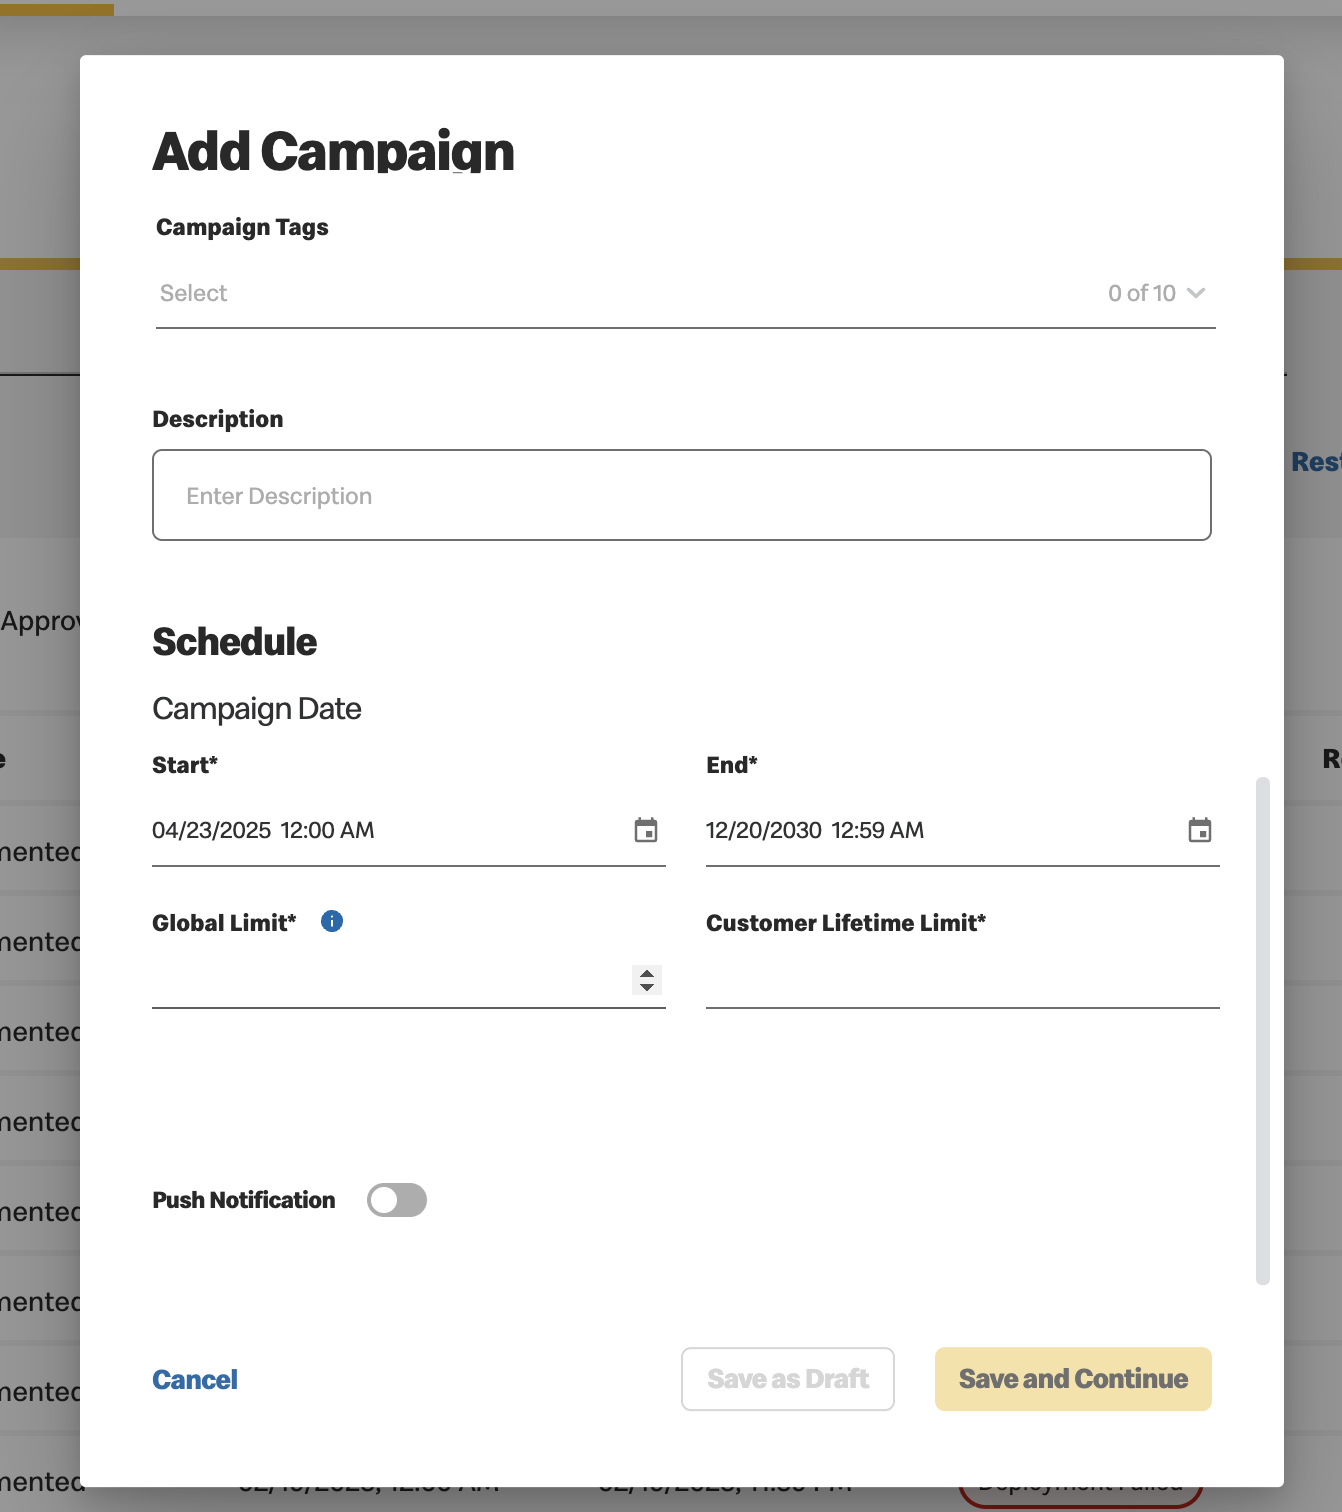
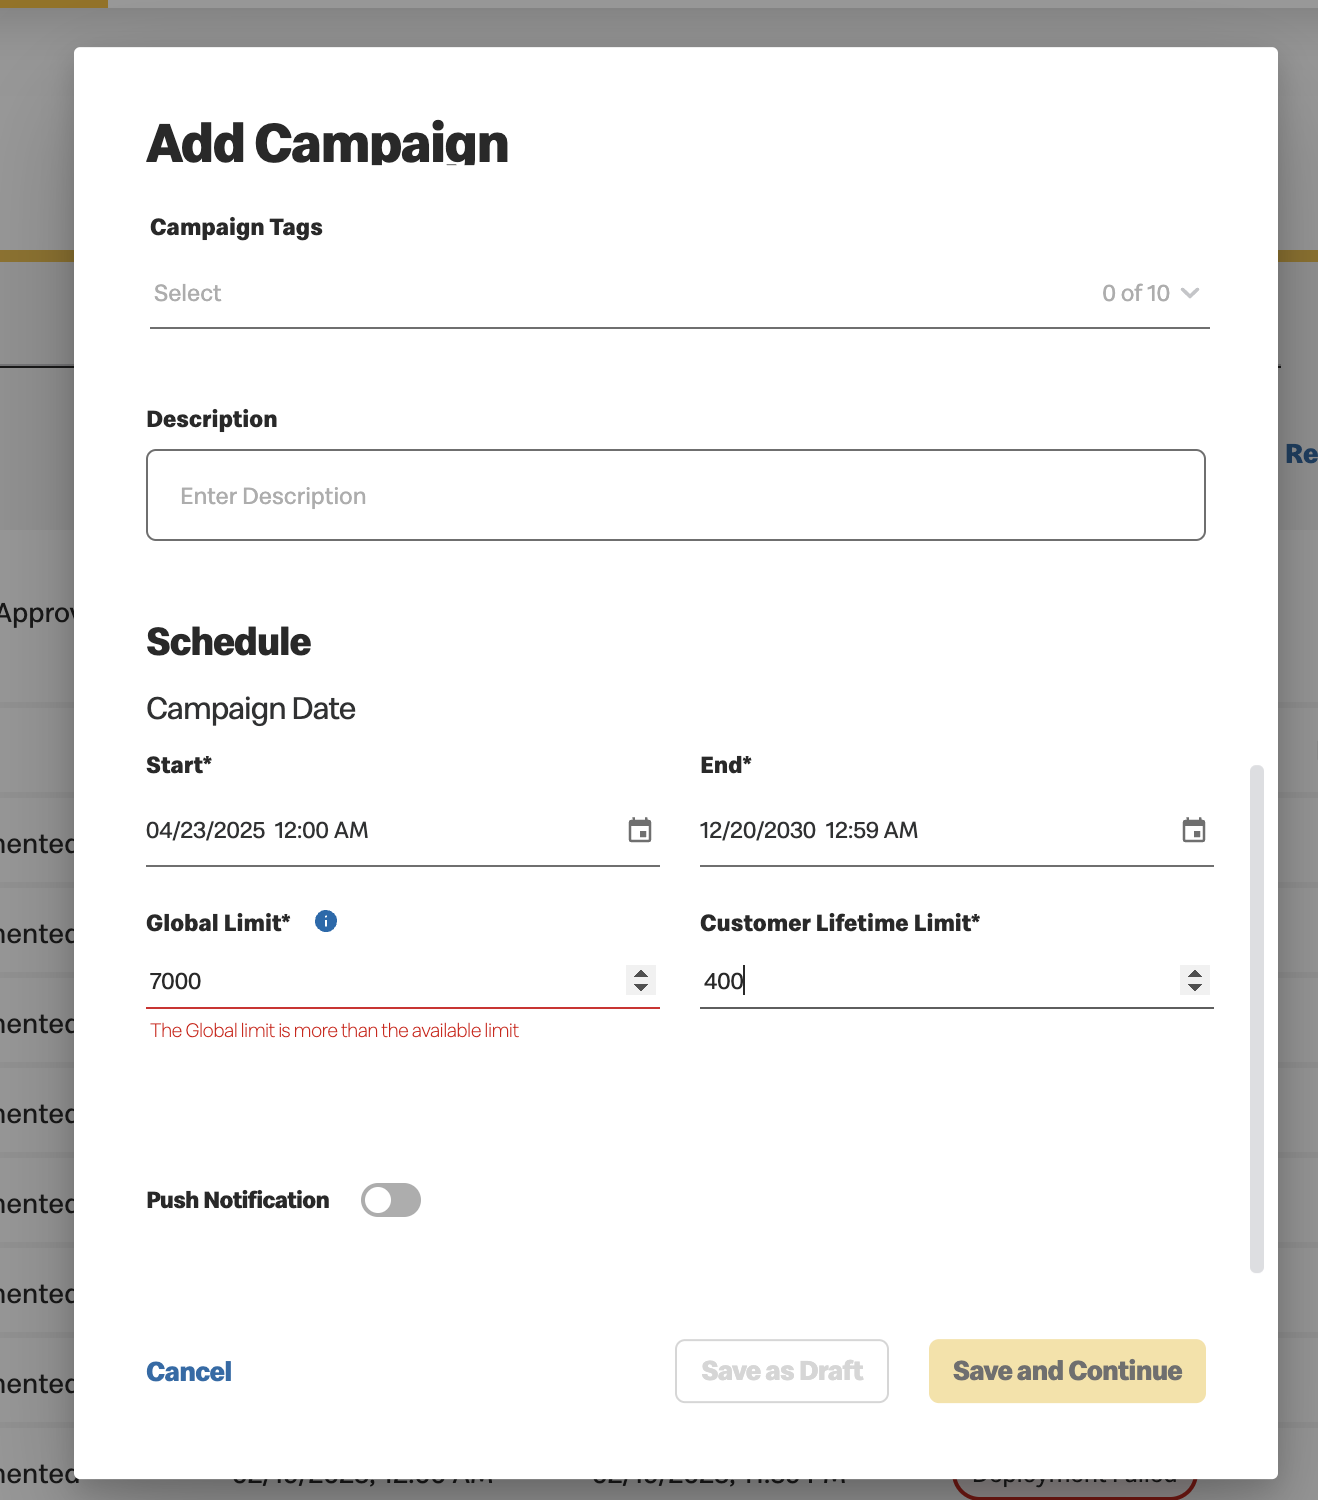
- Update the following new fields:
- Global Limit: This defines the maximum number of redemptions allowed for the selected voucher. The latest available count will be displayed, and an information icon will provide further details.
- Customer Lifetime Limit: This defines the maximum number of redemptions allowed per customer for the selected voucher.

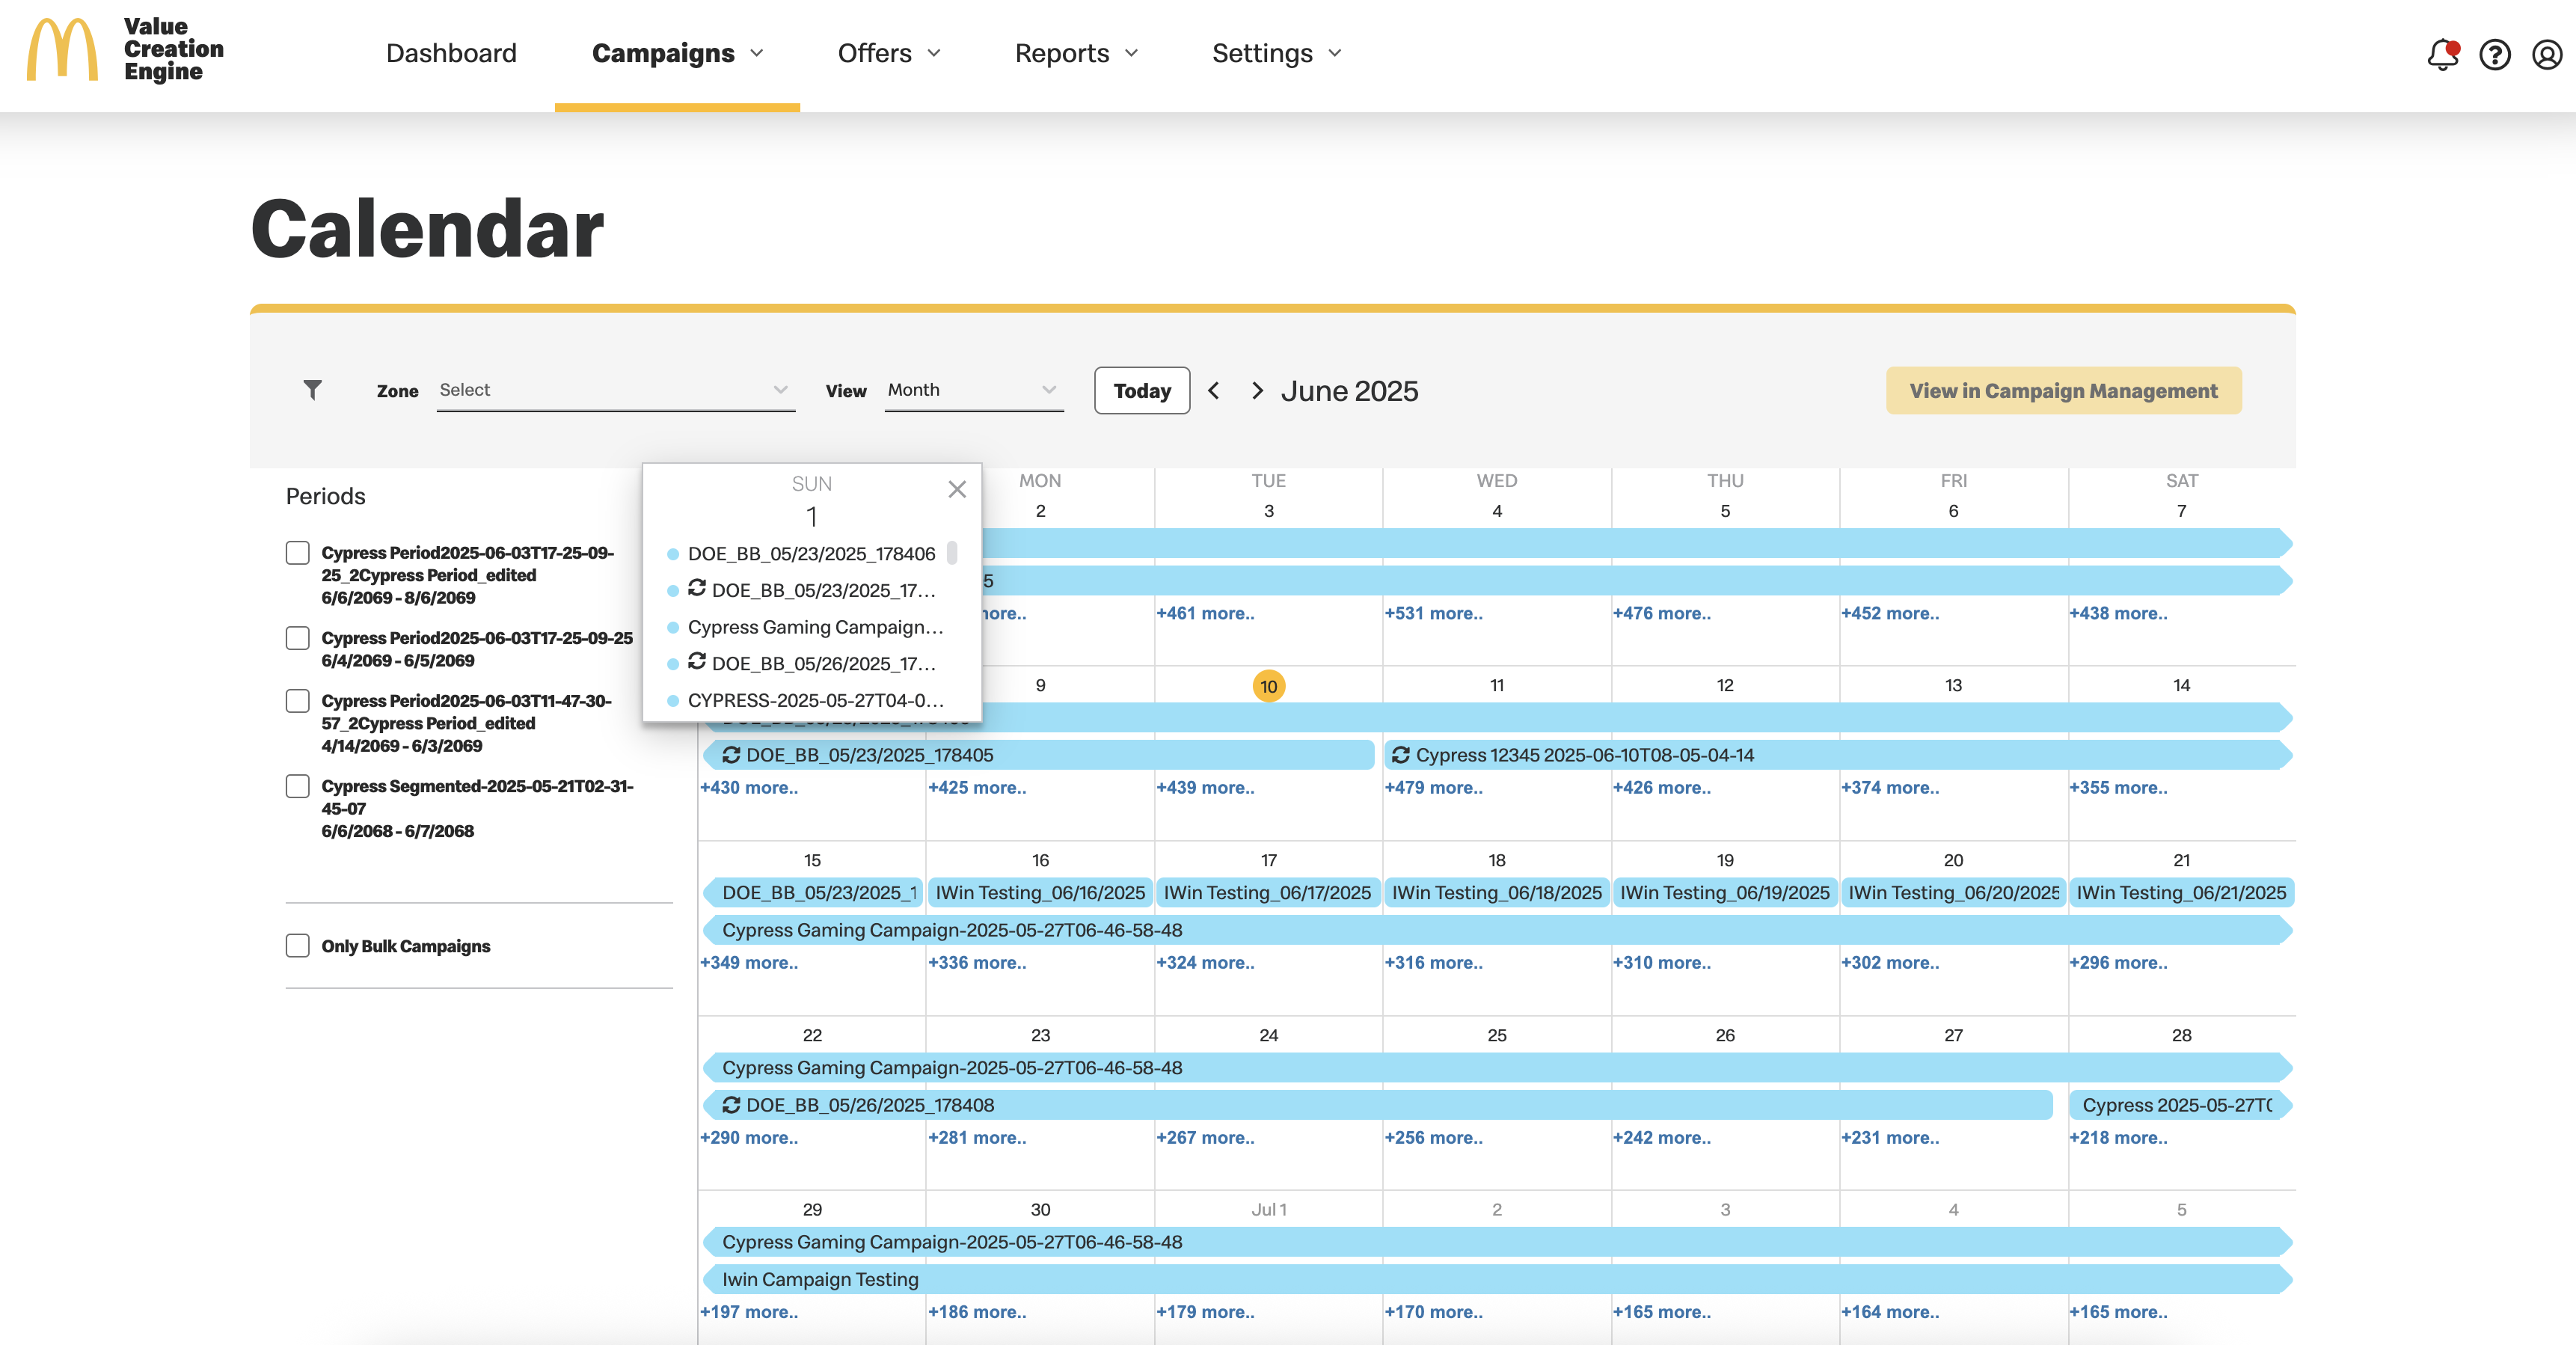
Calendar
From the Calendar submenu, you can view all scheduled campaigns (archived and rejected campaigns are not displayed).
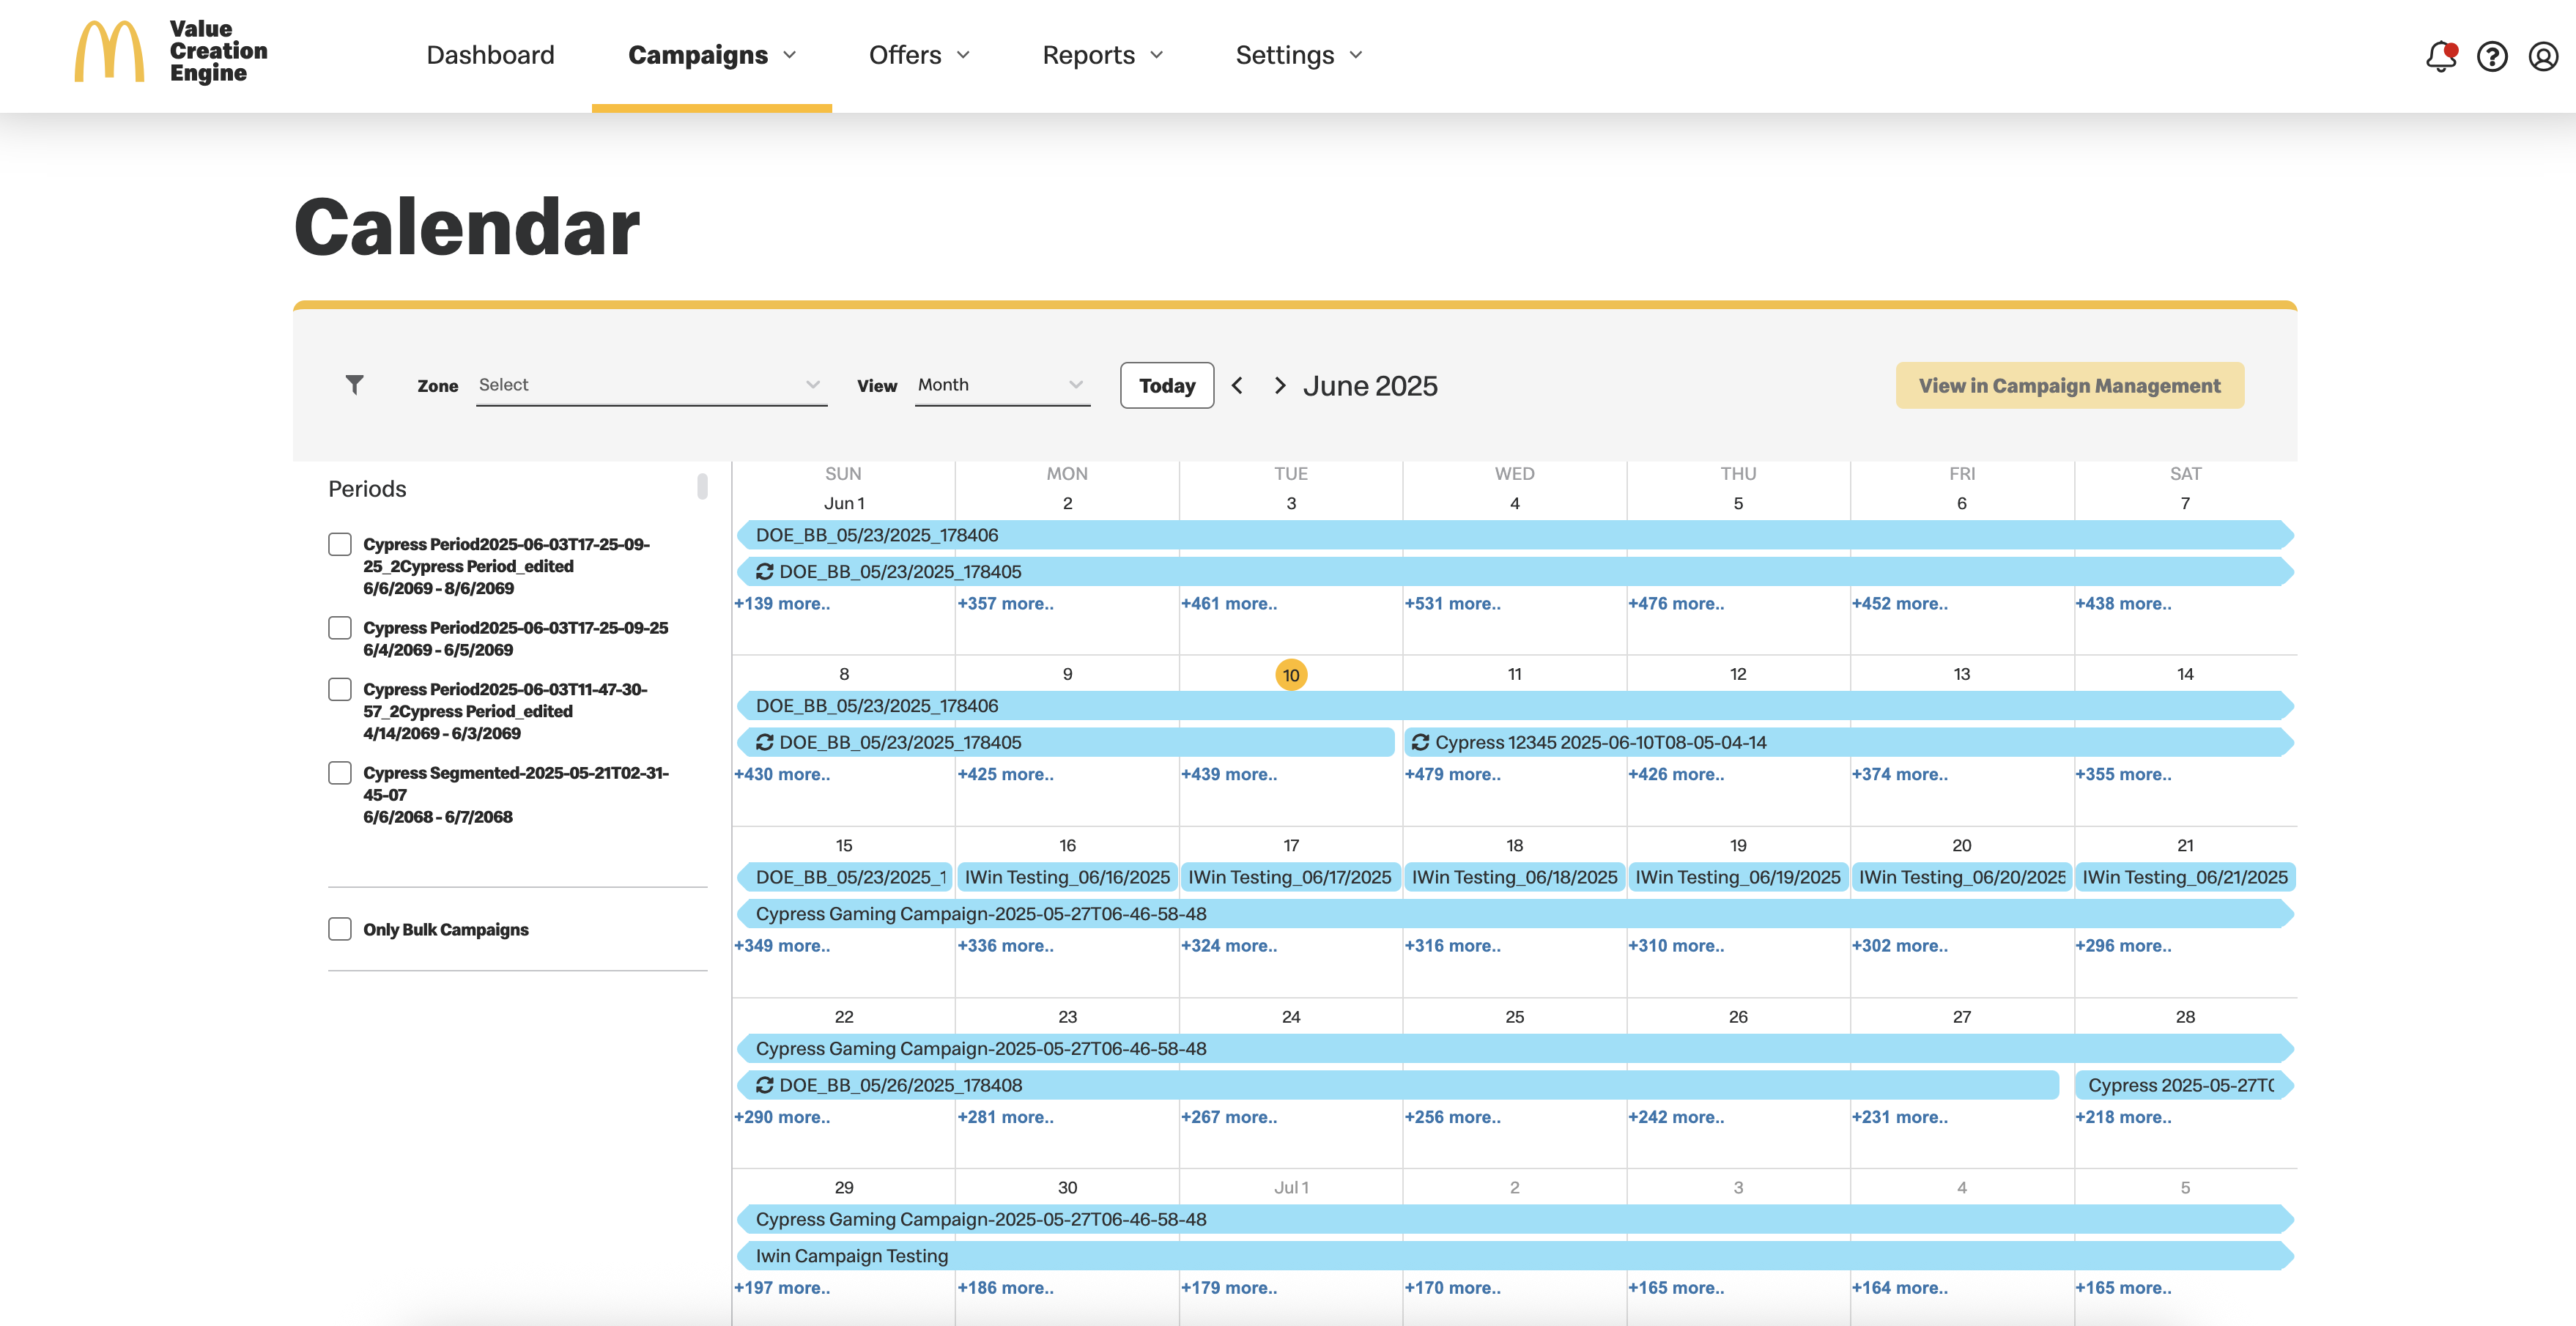
Notice the important information that appears on this screen and actions available.
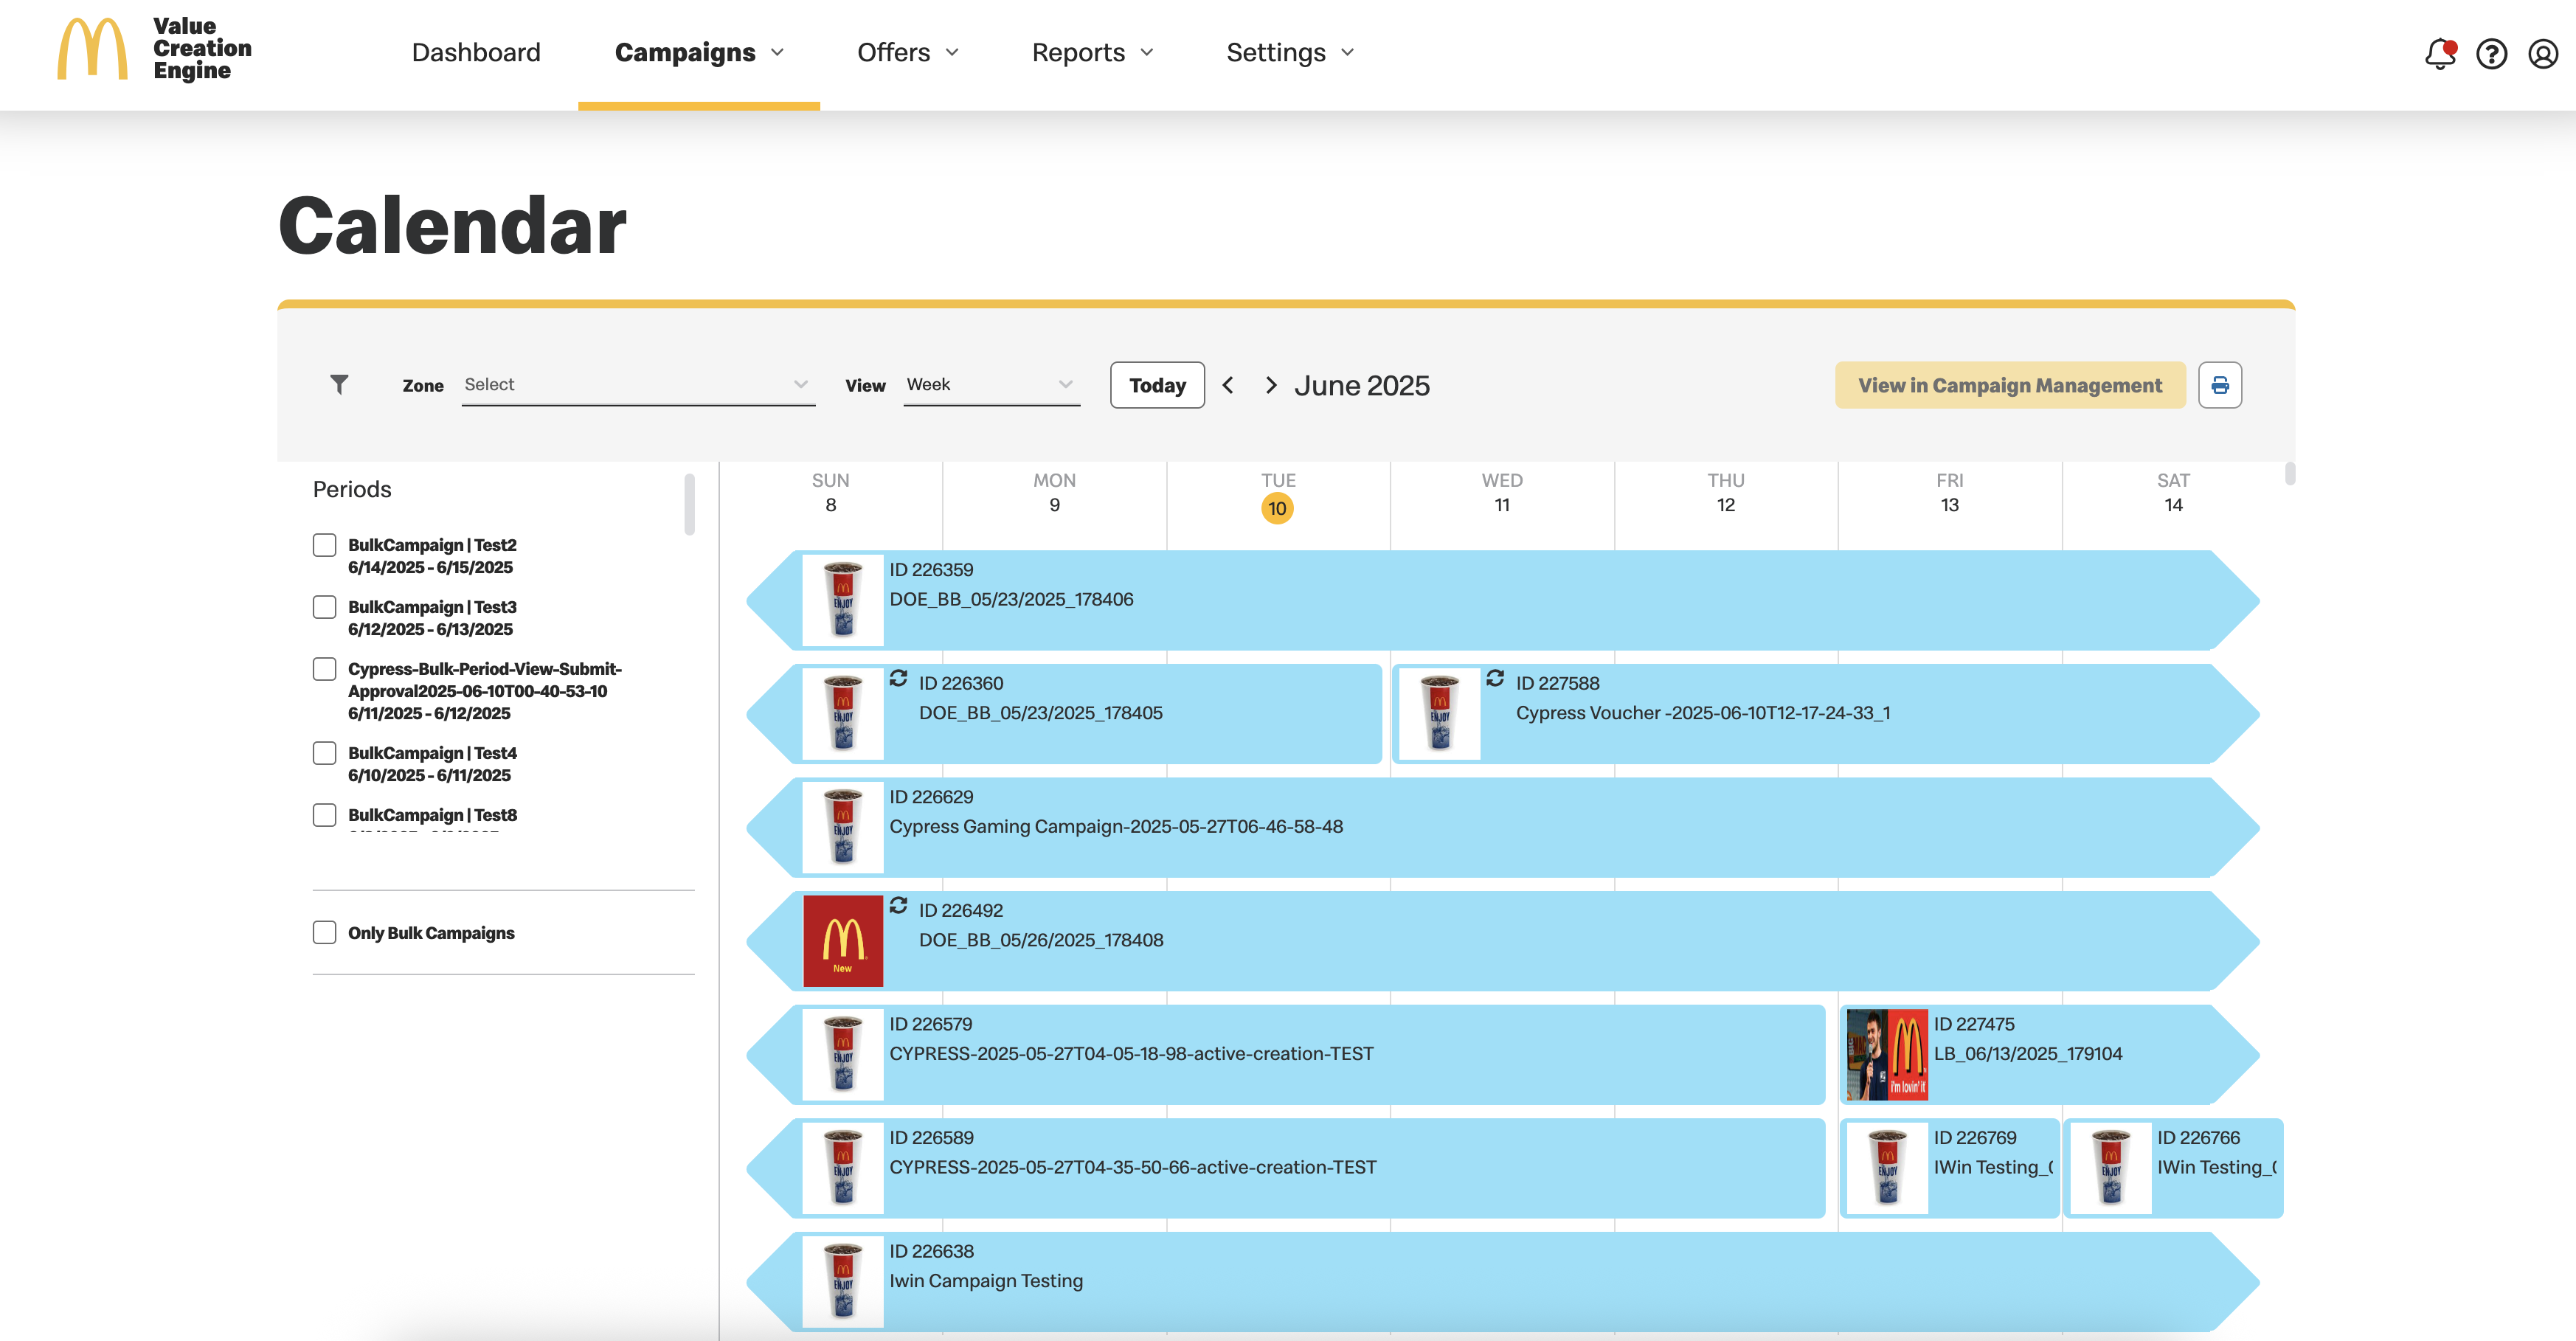
- By default, a monthly view is displayed and you can drill down to a weekly view as well.
- Easily navigate to view the month/week you wish to display
- Click on any campaign to view campaign details
- When you see "Total" with a number that follows, you can click to view all campaigns relevant for that
day. Then
select which campaign details to view.
Total 14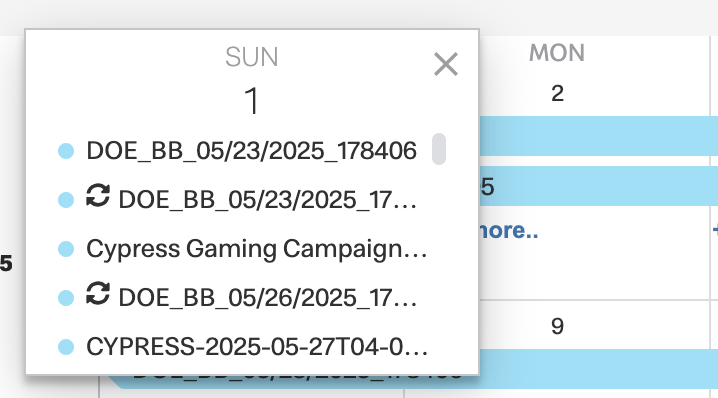
|
|
When viewing campaign details, you are not able to make any changes. You must select View in Campaign Management to edit any details. |
Understanding your calendar:
- If the market is set to Local Management:
- Local Campaigns are displayed in purple
- A zone filter is available
- If the calendar is in weekly view, you will see a
 printer icon at the right, which will allow
you to print the calendar as a PDF
printer icon at the right, which will allow
you to print the calendar as a PDF - Non-local Campaigns are displayed in blue.
- When the market is set to apply periods:
- A period filter is displayed on the left
- At least one period must be selected to enable the View in Campaign Management actions button
- The
.png) icon reflects campaigns that are dependent upon a trigger
event
icon reflects campaigns that are dependent upon a trigger
event - The
.png) icon reflects that this is a recurring campaign
icon reflects that this is a recurring campaign - The
 bell icon
reflects that the campaign has a push notification
bell icon
reflects that the campaign has a push notification
Schedule Management
|
|
Schedule Management is only available when the market is set for local management and schedule periods. |
Schedule Management allows you to manage your campaign approvals at the zone and period levels and includes:
- Bulk approval
- Wholistic view of the approval status of each zone schedule
To approve an entire schedule, select the period and all zones are presented according to their schedule approval status.
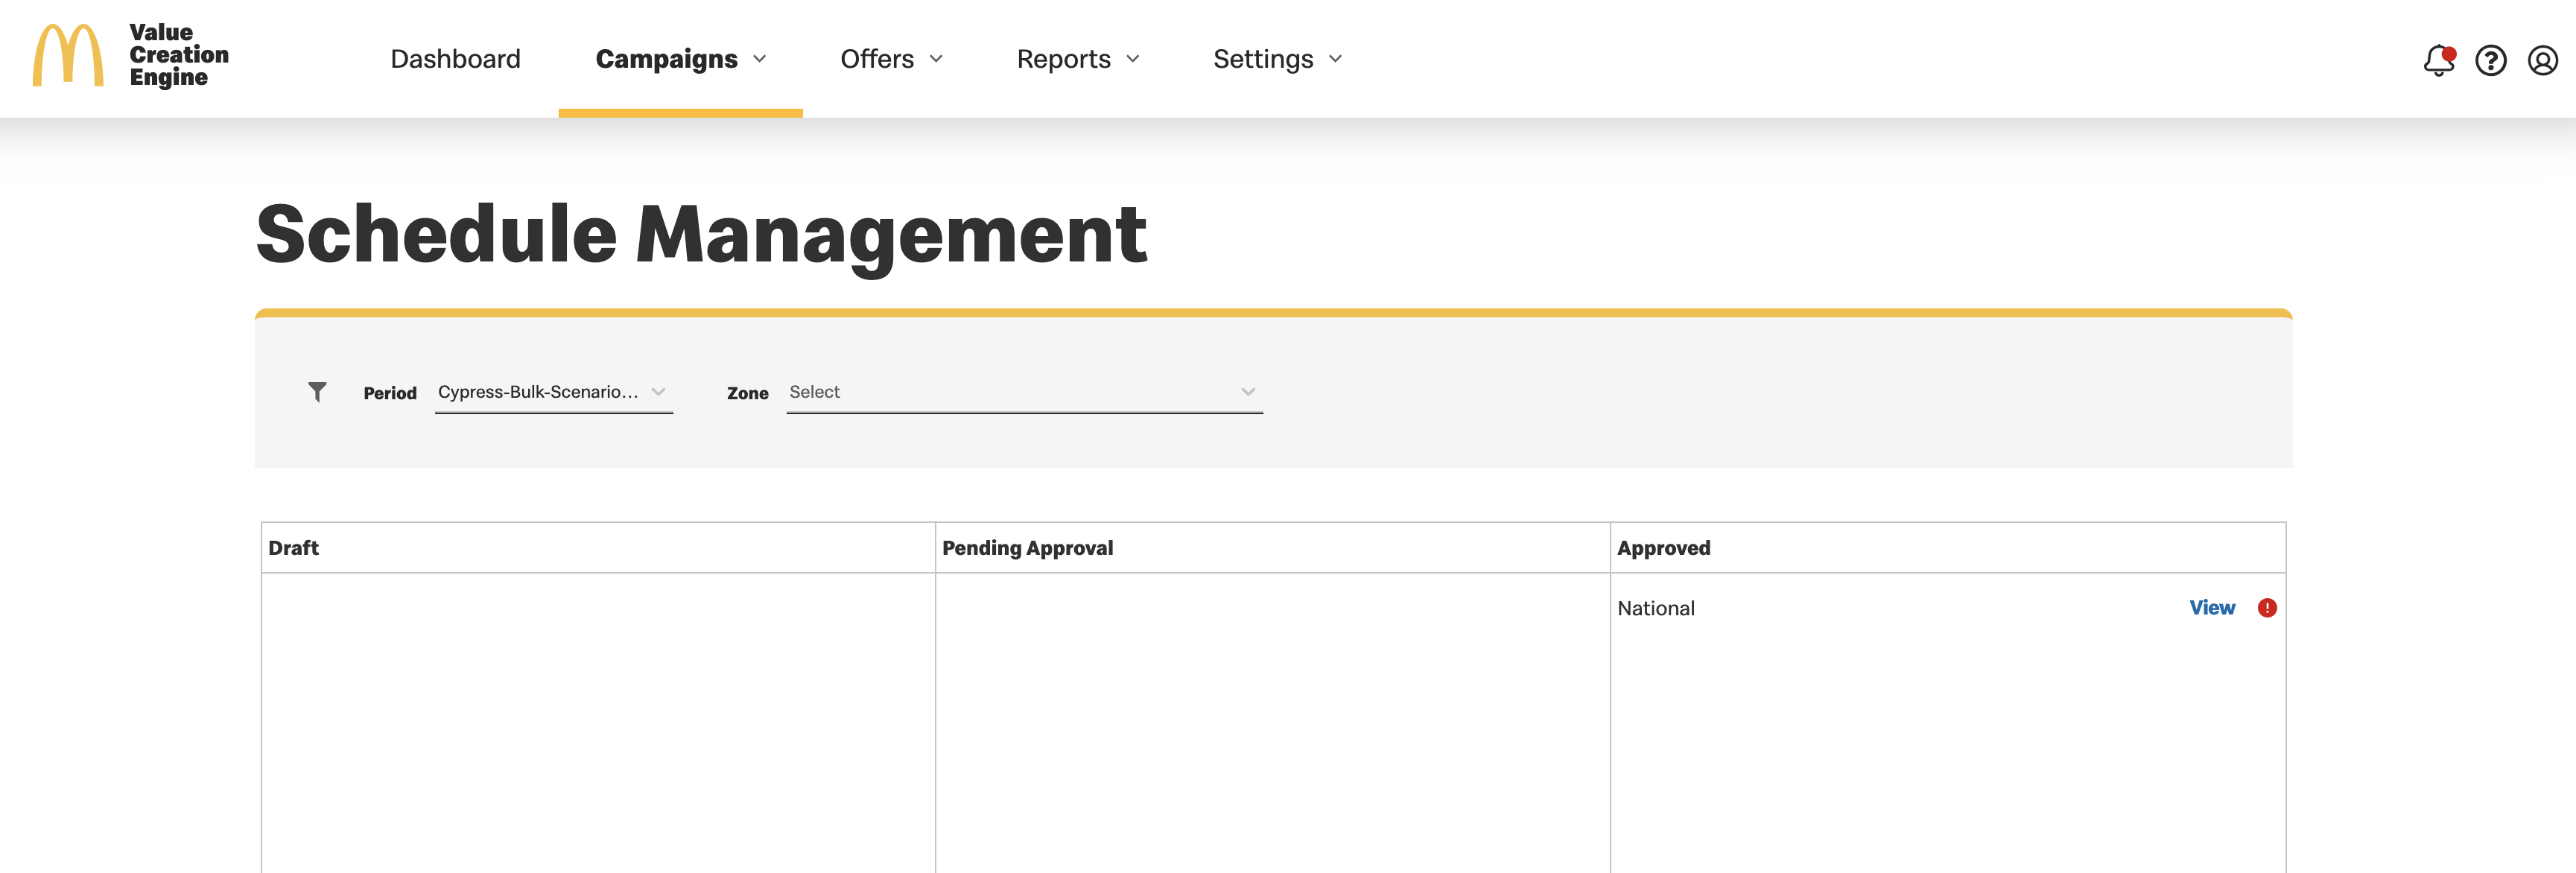
You can Submit for Approval, Approve and get a calendar View of each schedule.
If you want to submit for approval or approve a single, multiple date, or trigger event bulk (or national) campaign(s):
- Select the period assigned to the campaign(s)
- Optionally, the zone (or national in the case of national campaigns) may be filtered through the dropdown menu
- If the period chosen is live, as long as the start date of the campaign(s) has not passed, the campaign(s) can still be approved
- You will be allowed to submit the campaign(s) for approval by clicking “Submit for Approval” when the zone is under the Draft column and “Approve” when the zone is under the Pending column in schedule management.
- The “View” button shows all the associated bulk campaigns for the selected period and zone in Campaign Management.
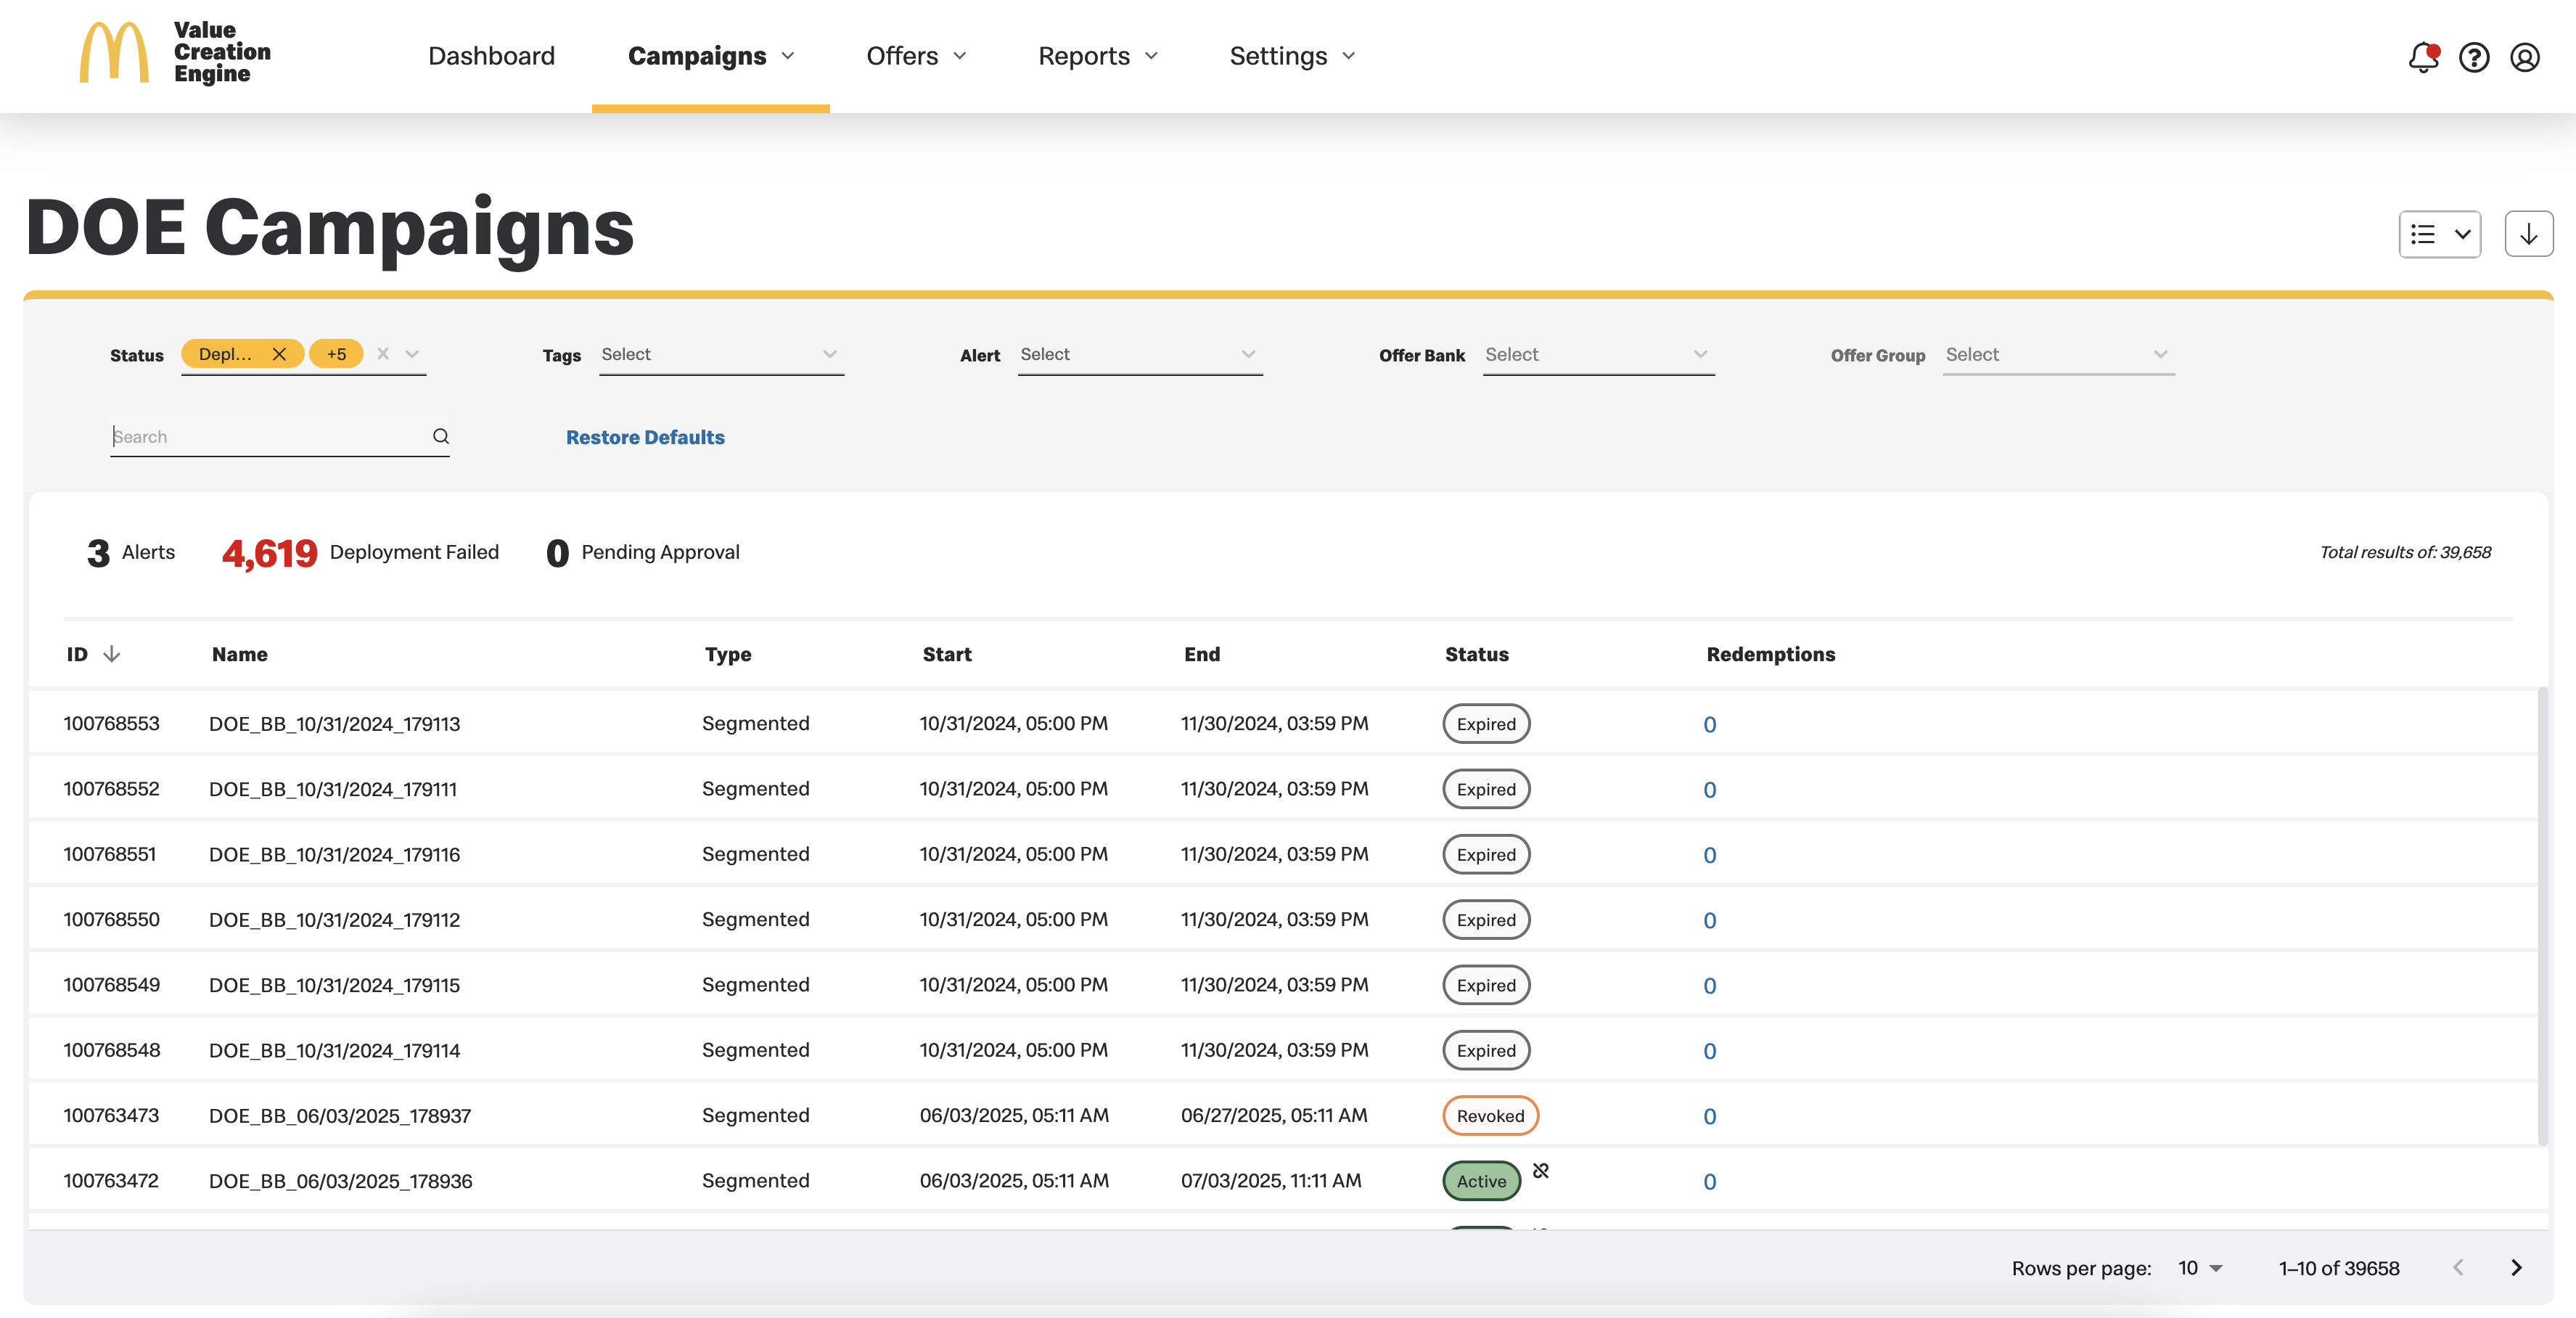
DOE Campaigns
-
Updates to DOE Campaign Tab in Campaign Section
- Access and Navigation
- All user roles have access to the DOE Campaign list screen.
- A new tab, "DOE Campaigns", will be added under the "Campaigns" menu.
- Clicking on this tab navigates users to the DOE Campaign list screen, displaying only DOE Campaign.
- Screen Functionality
- Filters:
- Existing filters for Status, Tags, Alert and Search will persist.
- New Filters:
- Offer Bank and Offer Group:
- Multi-select dropdowns.
- Offer Group will be enabled only when Offer Bank is selected.
- Offer Group and Offer Bank drop down values are searchable.
- Bulk Actions:
- Bulk Stop Association
- Bulk Revoke
- Campaign Display:
- Only campaigns with the following statuses will be displayed:
- Deployment Pending
- Deployed
- Active
- Deployment Failed
- Revoked
- Expired
- Archived
- Status Filter will contain only these values.
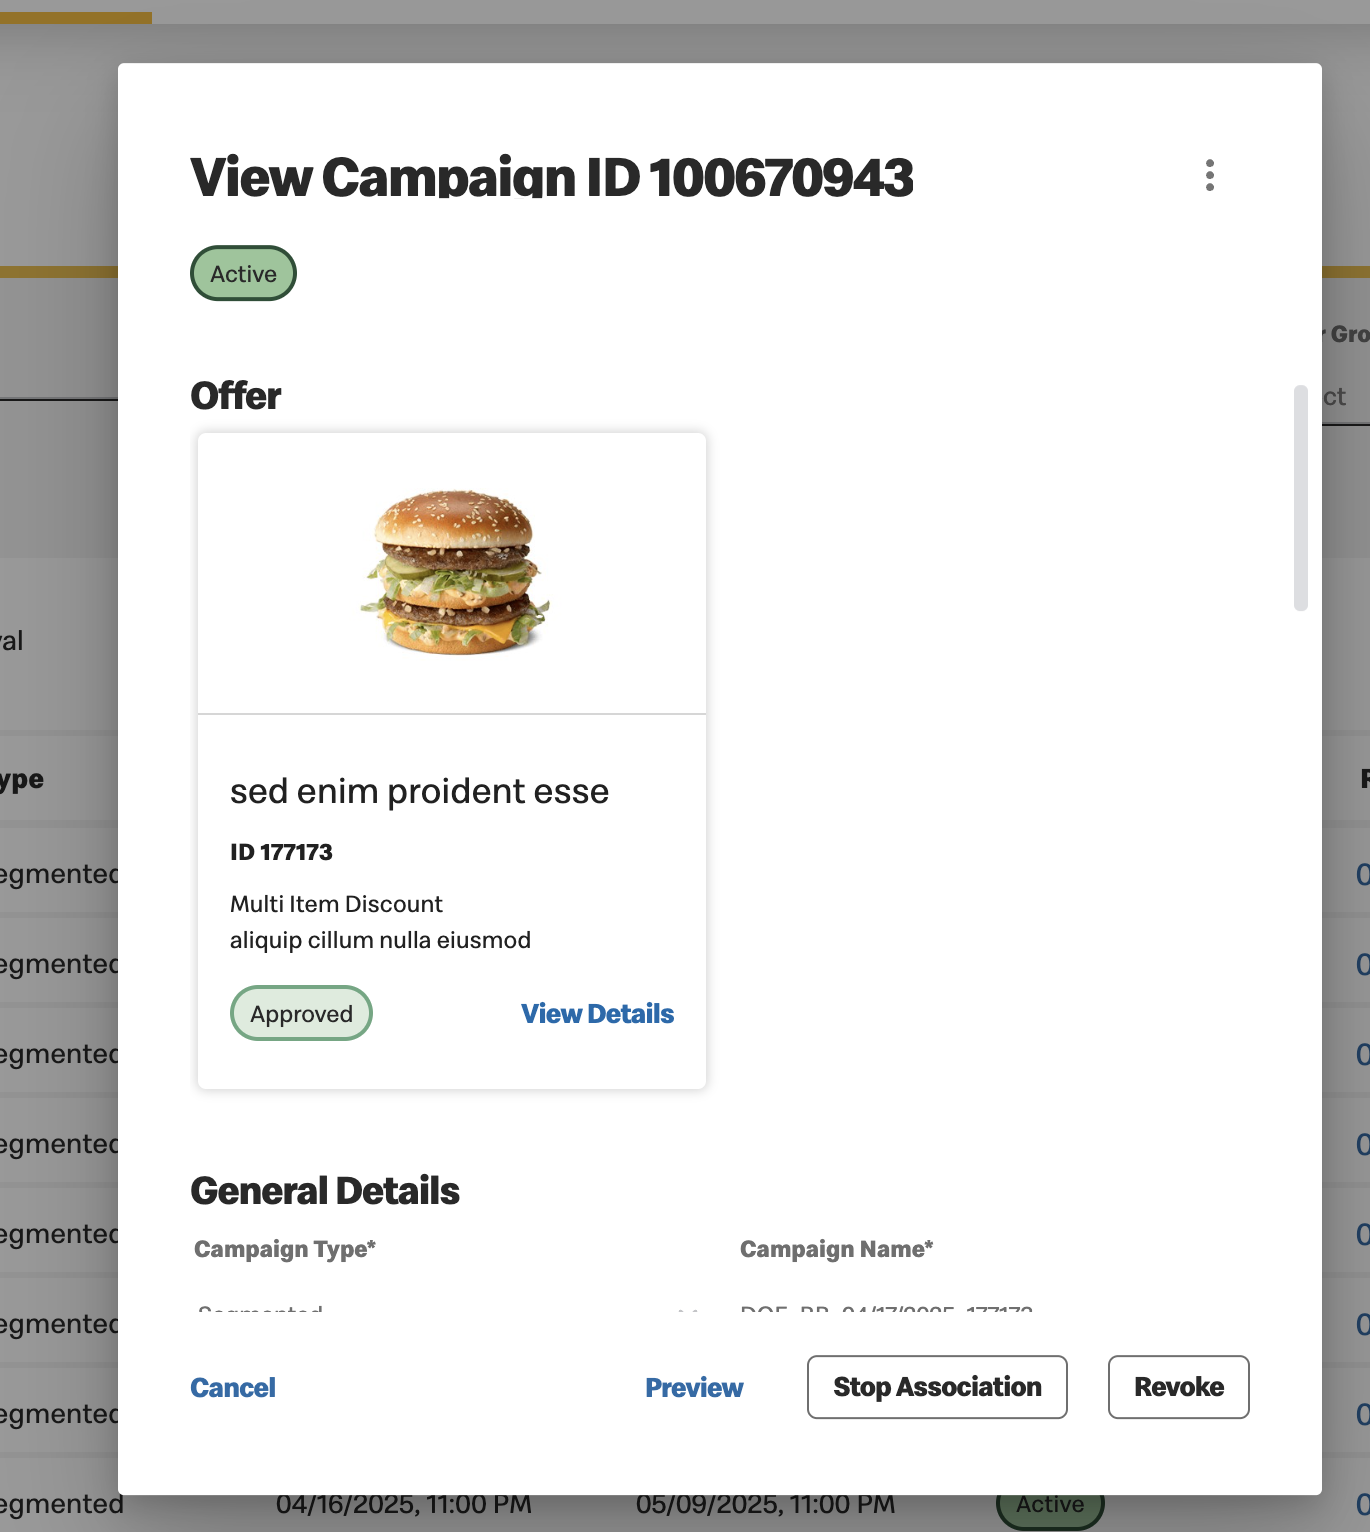
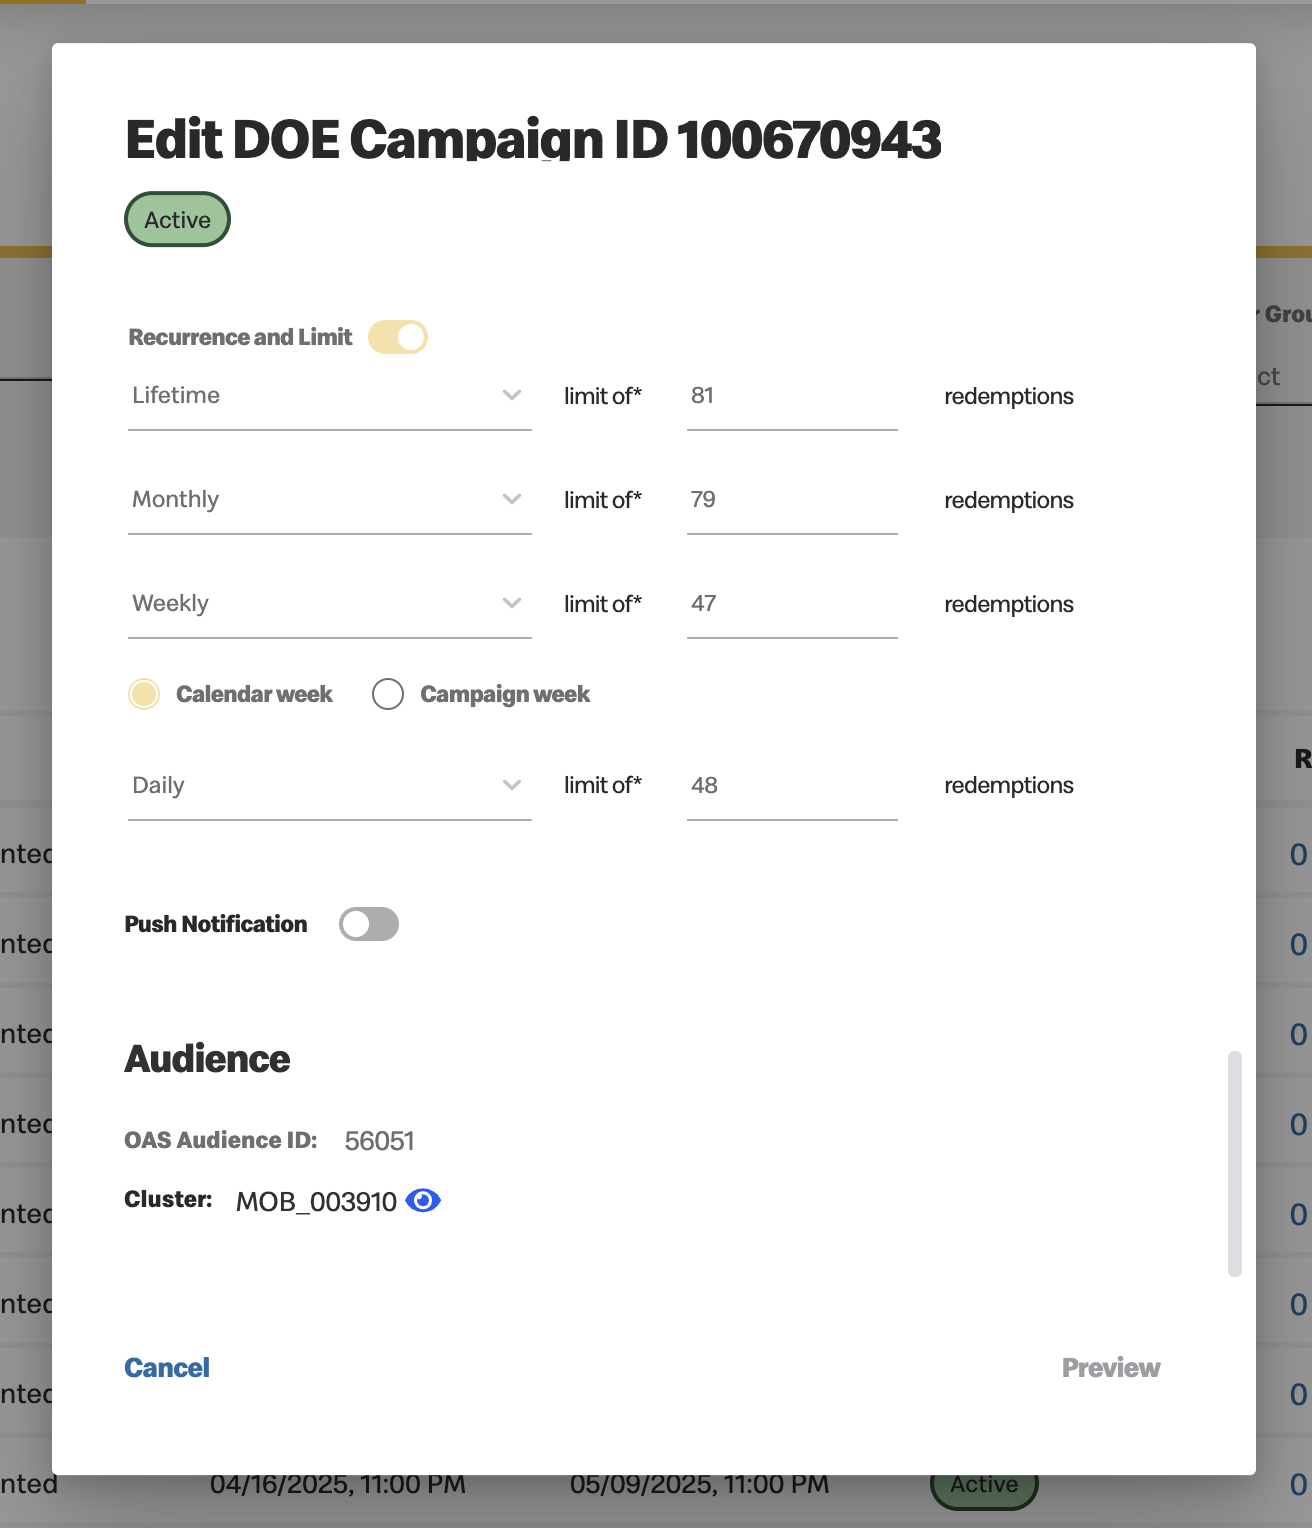
Updates to DOE Campaign View Screen
- Screen Details
- Audience ID
- OAS Audience ID: Free text field.
- Clusters: Displayed with an eye icon.
- Clicking the eye icon shows the list of cluster IDs associated with the campaign.
- Allowed Actions
- Displayed Buttons:
- Stop Association.
- Revoke (based on campaign status).
- Edit.
- Close.
- User cannot Duplicate or Archive the Campaign.
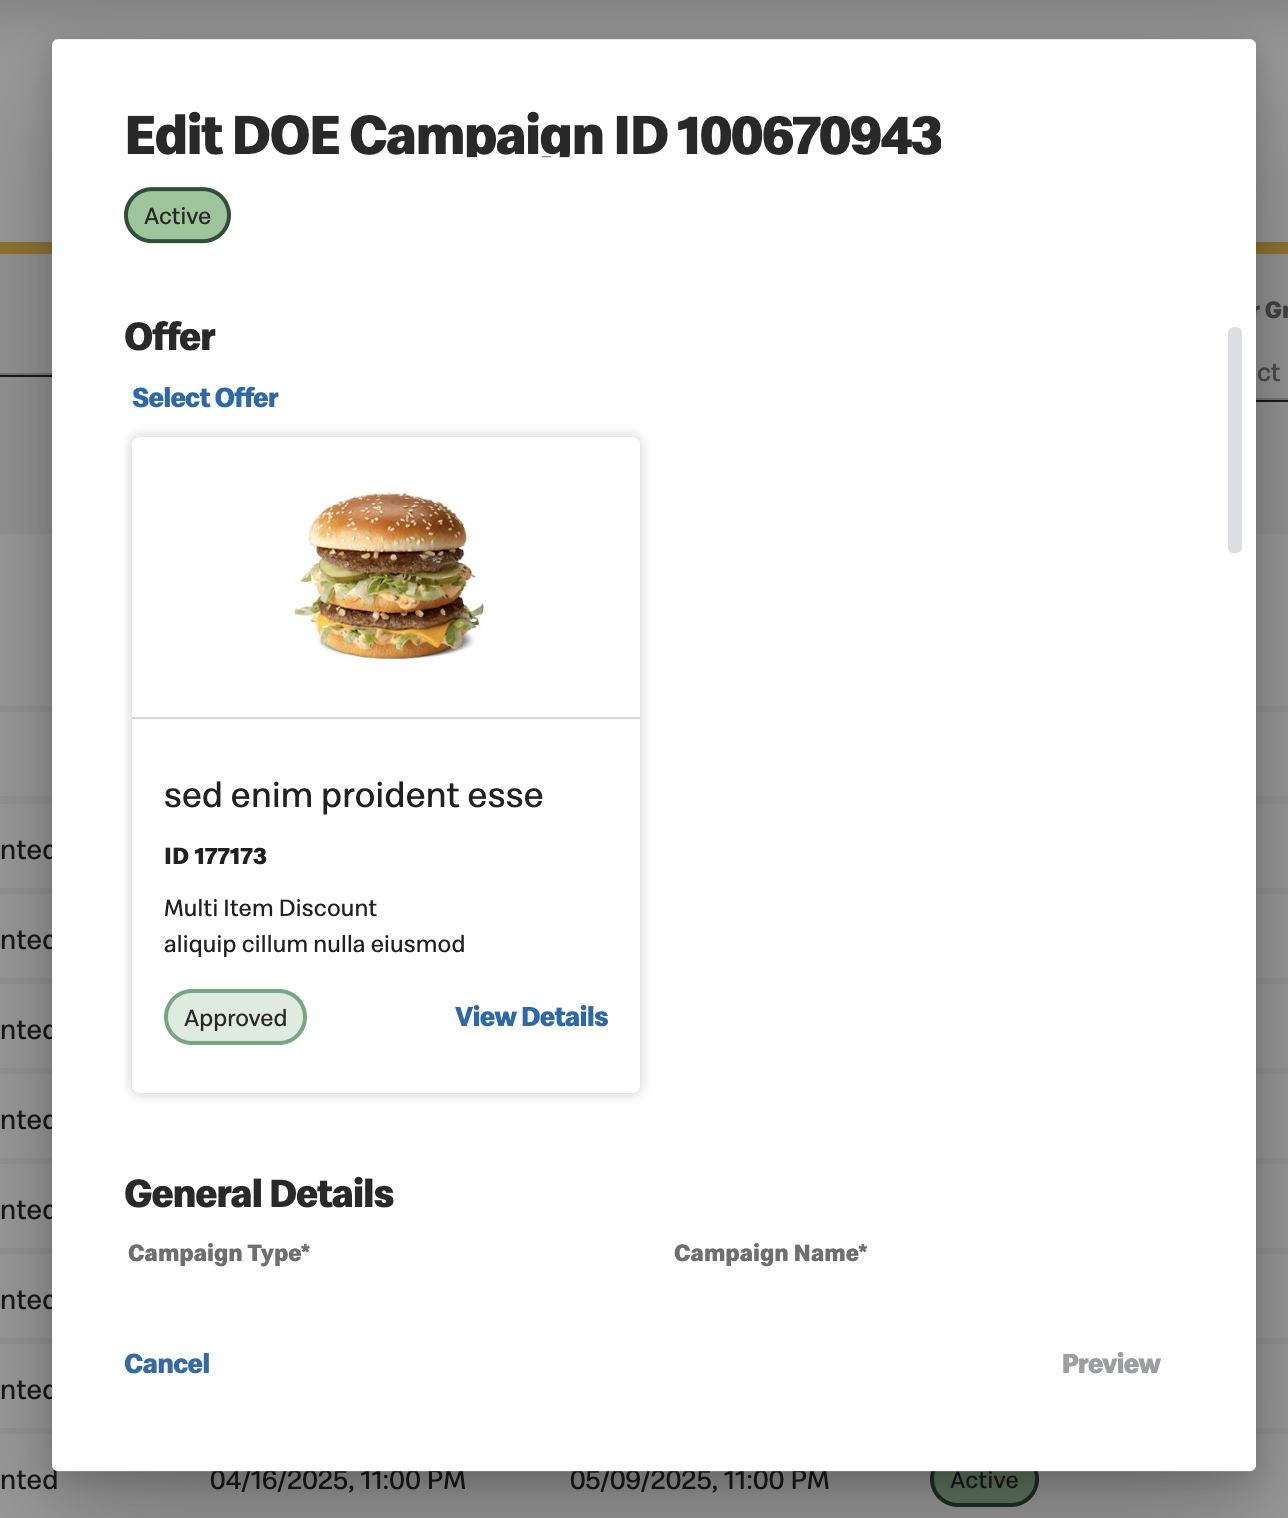
- Updates to DOE Campaign Edit Screen
The DOE Campaign View Screen will display details identical to the BAU Campaign View Screen, with the following additions:
| Campaign Fields |
Editable(Admin Only)
|
|
Description
|
Yes
|
|
Tags
|
Yes
|
|
Campaign End Date
|
Yes
|
|
Campaign End Time
|
Yes
|
|
Validity Days
|
Yes
|
|
Validity times
|
Yes
|
|
Location
|
Yes
|
|
Priority
|
Yes
|
|
Offer
|
No
|
|
Campaign Type
|
No
|
|
Campaign Name
|
No
|
|
Campaign Start Date
|
No
|
|
Campaign Start Time
|
No
|
|
Expiration Period Days
|
No
|
|
Recurring Value
|
No
|
|
Push Notification
|
No
|
|
OAS Audience ID
|
No
|
|
Cluster
|
No
|
Auto-Approval
- Campaigns will be auto approved and applied upon saving the edited details.
Previous Topic Next Topic